
This blog lists and describes navigation games and resources that are useful for teaching navigation. All of what is contained here is explained in the National Navigation Award Tutor Course, which we run several times a year. The Tutor Award course is a prerequisite to being able to deliver the suite of National Navigation Award courses; i.e., the Discovery Award (one, two, and three-star) and the Bronze, Silver, and Gold NNAS Award Courses. This blog is also part of a series I’ve written. The others are:
The games and resources are grouped under the following headings:
- Learning about maps
- Learning about contours
- Learning how to use a compass
Learning about Maps
Drawing a Map – Learning Outcomes: learners can make a scale drawing of a landscape by designing map symbols and visualizing what it looks like from above; learners can set a map to the north; learners can follow a route using a map set to the north.

Resources: 50m rope, clipboards, pens and paper, cones, and a North symbol.
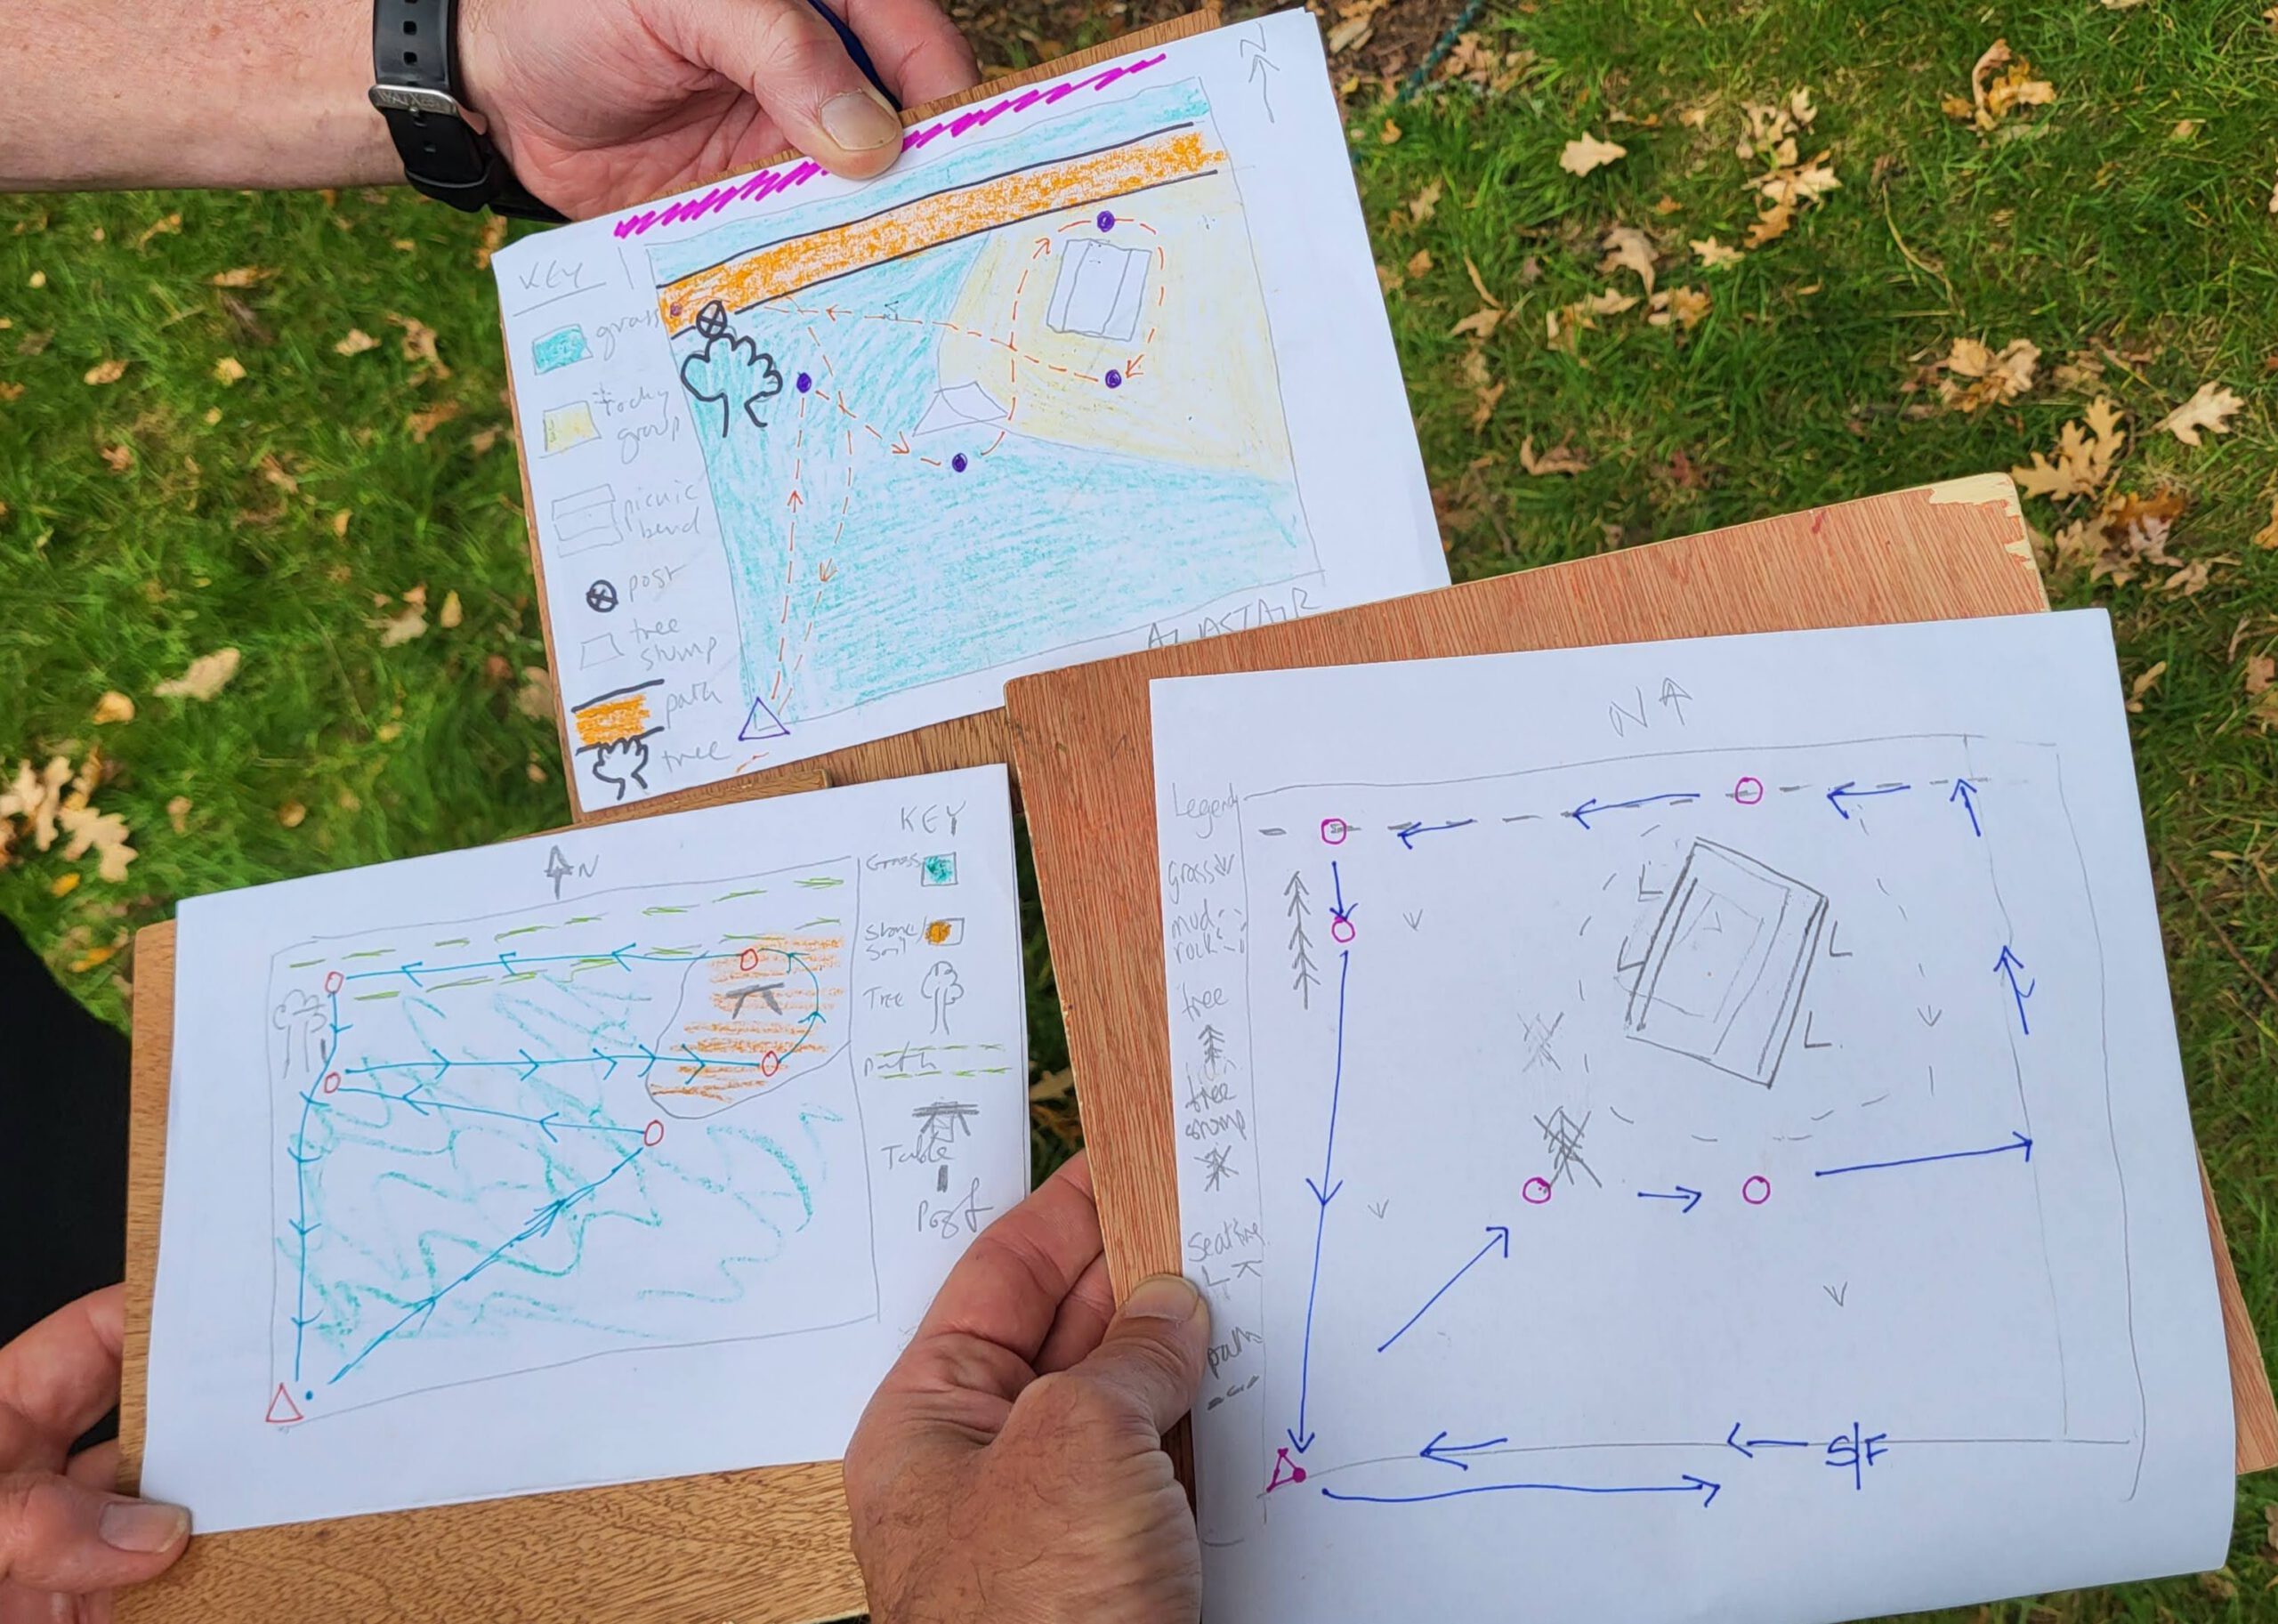
Description: This is a good game to introduce to learners what a map is: a diagrammatic representation of a landscape. Look for a landscape that will be interesting to map; for example, an area of parkland that has some paths, a tree, a shrub, a picnic table, a bin, etc. Next draw out a square or rectangle shape using rope, perhaps 10m x 10m. You can make it bigger if you have a second rope. Make sure the sides of the square are aligned to the north. Set out your north symbol on the northern side of the square. Now stand at the southern side with the learners. Give a brief explanation of what north is and explain that you will be mapping what is inside the square, using map symbols. Each learner gets a clipboard, a sheet of paper, and a pencil. Participants draw a square on their paper, making sure they leave a margin, big enough for the map symbol legend. Now draw the north symbol arrow in the margin. Learners also write their names on the margin.
Now learners are instructed to design map symbols, to represent the different features in the roped-off square. Learners should write down what the feature is, beside the symbol. Next participants visualize or imagine what the landscape looks like from above and then draw the symbols in the correct parts of the map. Remember colour can be used too.
Now the Tutor positions cones in the landscape, perhaps five or six, and indicates with a further cone, positioned at the corner of the square, where the start/finish point is. Learners now draw where cones and the start/finish point are, on their map. The cones are drawn as circles (using coloured pen) and the start/finish point as a triangle. Learners now pick a different colour and draw a route, using a dashed line, that starts and finishes at the triangle and connects up all circles (in any order). Next, instruct the learners to orientate the map to the North, keep their map, pointing north at all times, and then follow their route. Once this has been done, a progression is to ask the participants to swap over maps and follow the route on the new map.
To recap the learning ask the learners to compare the maps they have drawn. What designs have been used to represent the features of the map? What designs worked well? Did they find it hard or easy to follow the route? Emphasize that all maps have map symbols, show where the north is, and are to scale.
9-Cone Setting the Map Game – Learning outcomes: Learners can follow a route using a map set to north; learners can relocate using a map set to north.
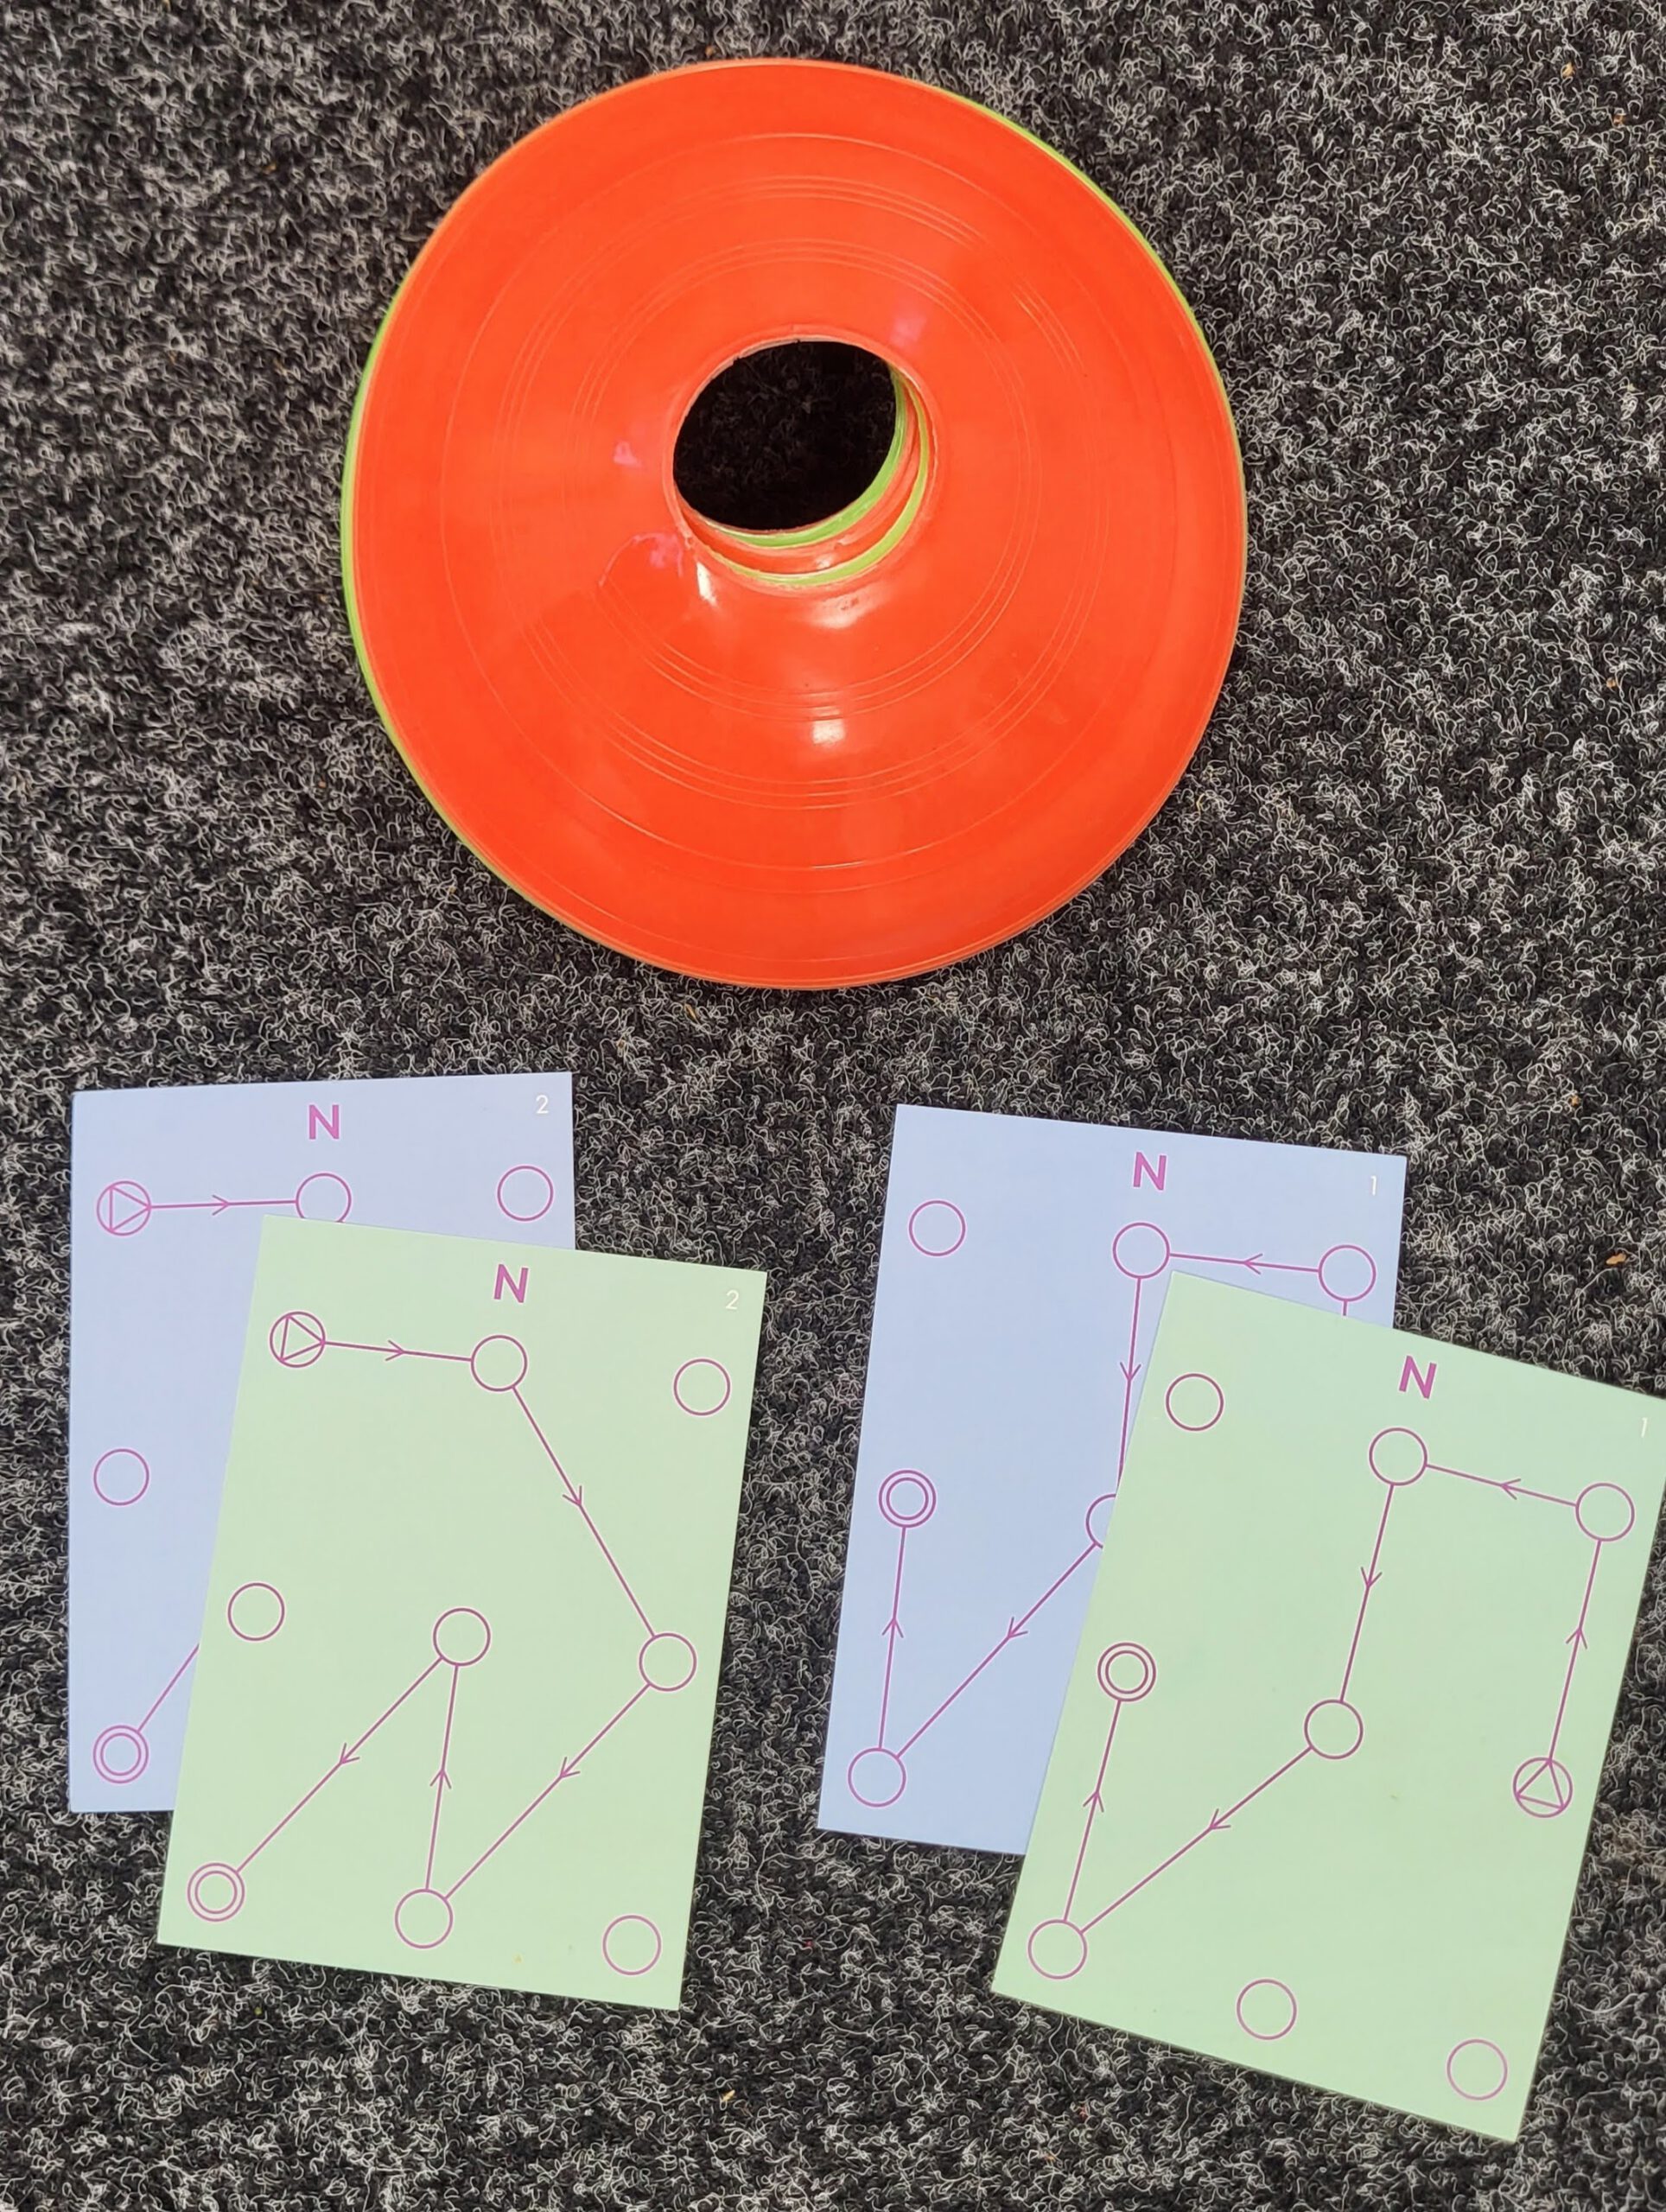
Resources: 9 cones and a set of cone cards. Open space in a hall or outside.
Description: Set out the nine cones, about four paces between each, three rows of three. Align your cones to the north. Stand with your participants at the southern end of the cones. Briefly explain what north is. Explain that the cones represent the landscape and the cards are simple maps. The cards come in pairs, e.g. set A, set B, set C. Split your group up into twos and hand out a set of cards. Explain that each card has a different route and each card has a different start and finish point, indicated by a coloured circle. The key learning outcome is understanding how to set the map to north, turning the map so that N of the card matches up with the northern side of the cones (this can be indicated by a laminated N symbol). Learners begin by orientating their cards to the north, then working out which cone is the start/finish cone. One participant in each group of two remains on the southern side of the cones. Their job is to check their partner goes the right way. The other learner in the pair goes and stands at the start/finish cone, then follows the route indicated on the card, always keeping the map set to north. Once finished the partners swap roles. You can have two or three on the cones at one time. With more participants you can also set out a second set of nine cones, to ensure the learners have plenty of space. Once everyone has had a go, give out a new set of cone cards and ask them to repeat. It is important that all learners get confident and competent at this skill.
A progression is to teach relocation, using the cone cards. Relocation means working out where you are when you are a bit lost. The tutor stands at one of the ones. Explain that you will call out a participant’s name. Explain that you will hand the cone card to the learner the wrong way round (i.e. not set to north). Instruct the learners that when their name is called, they walk to the cone, then, as a first step, set the card to the north. Once they have done this, they should work out where they are and then follow the remainder of the route to the end.
Maps from around the World – Learning Outcome: learners can identify where north is on a map; learners can identify where the map key is can interpret map symbols; learners can identify what the scale of a map is and work out what what distance one cm represents in the landscape.

Resources: a selection of maps from the UK and from around the world and compasses.
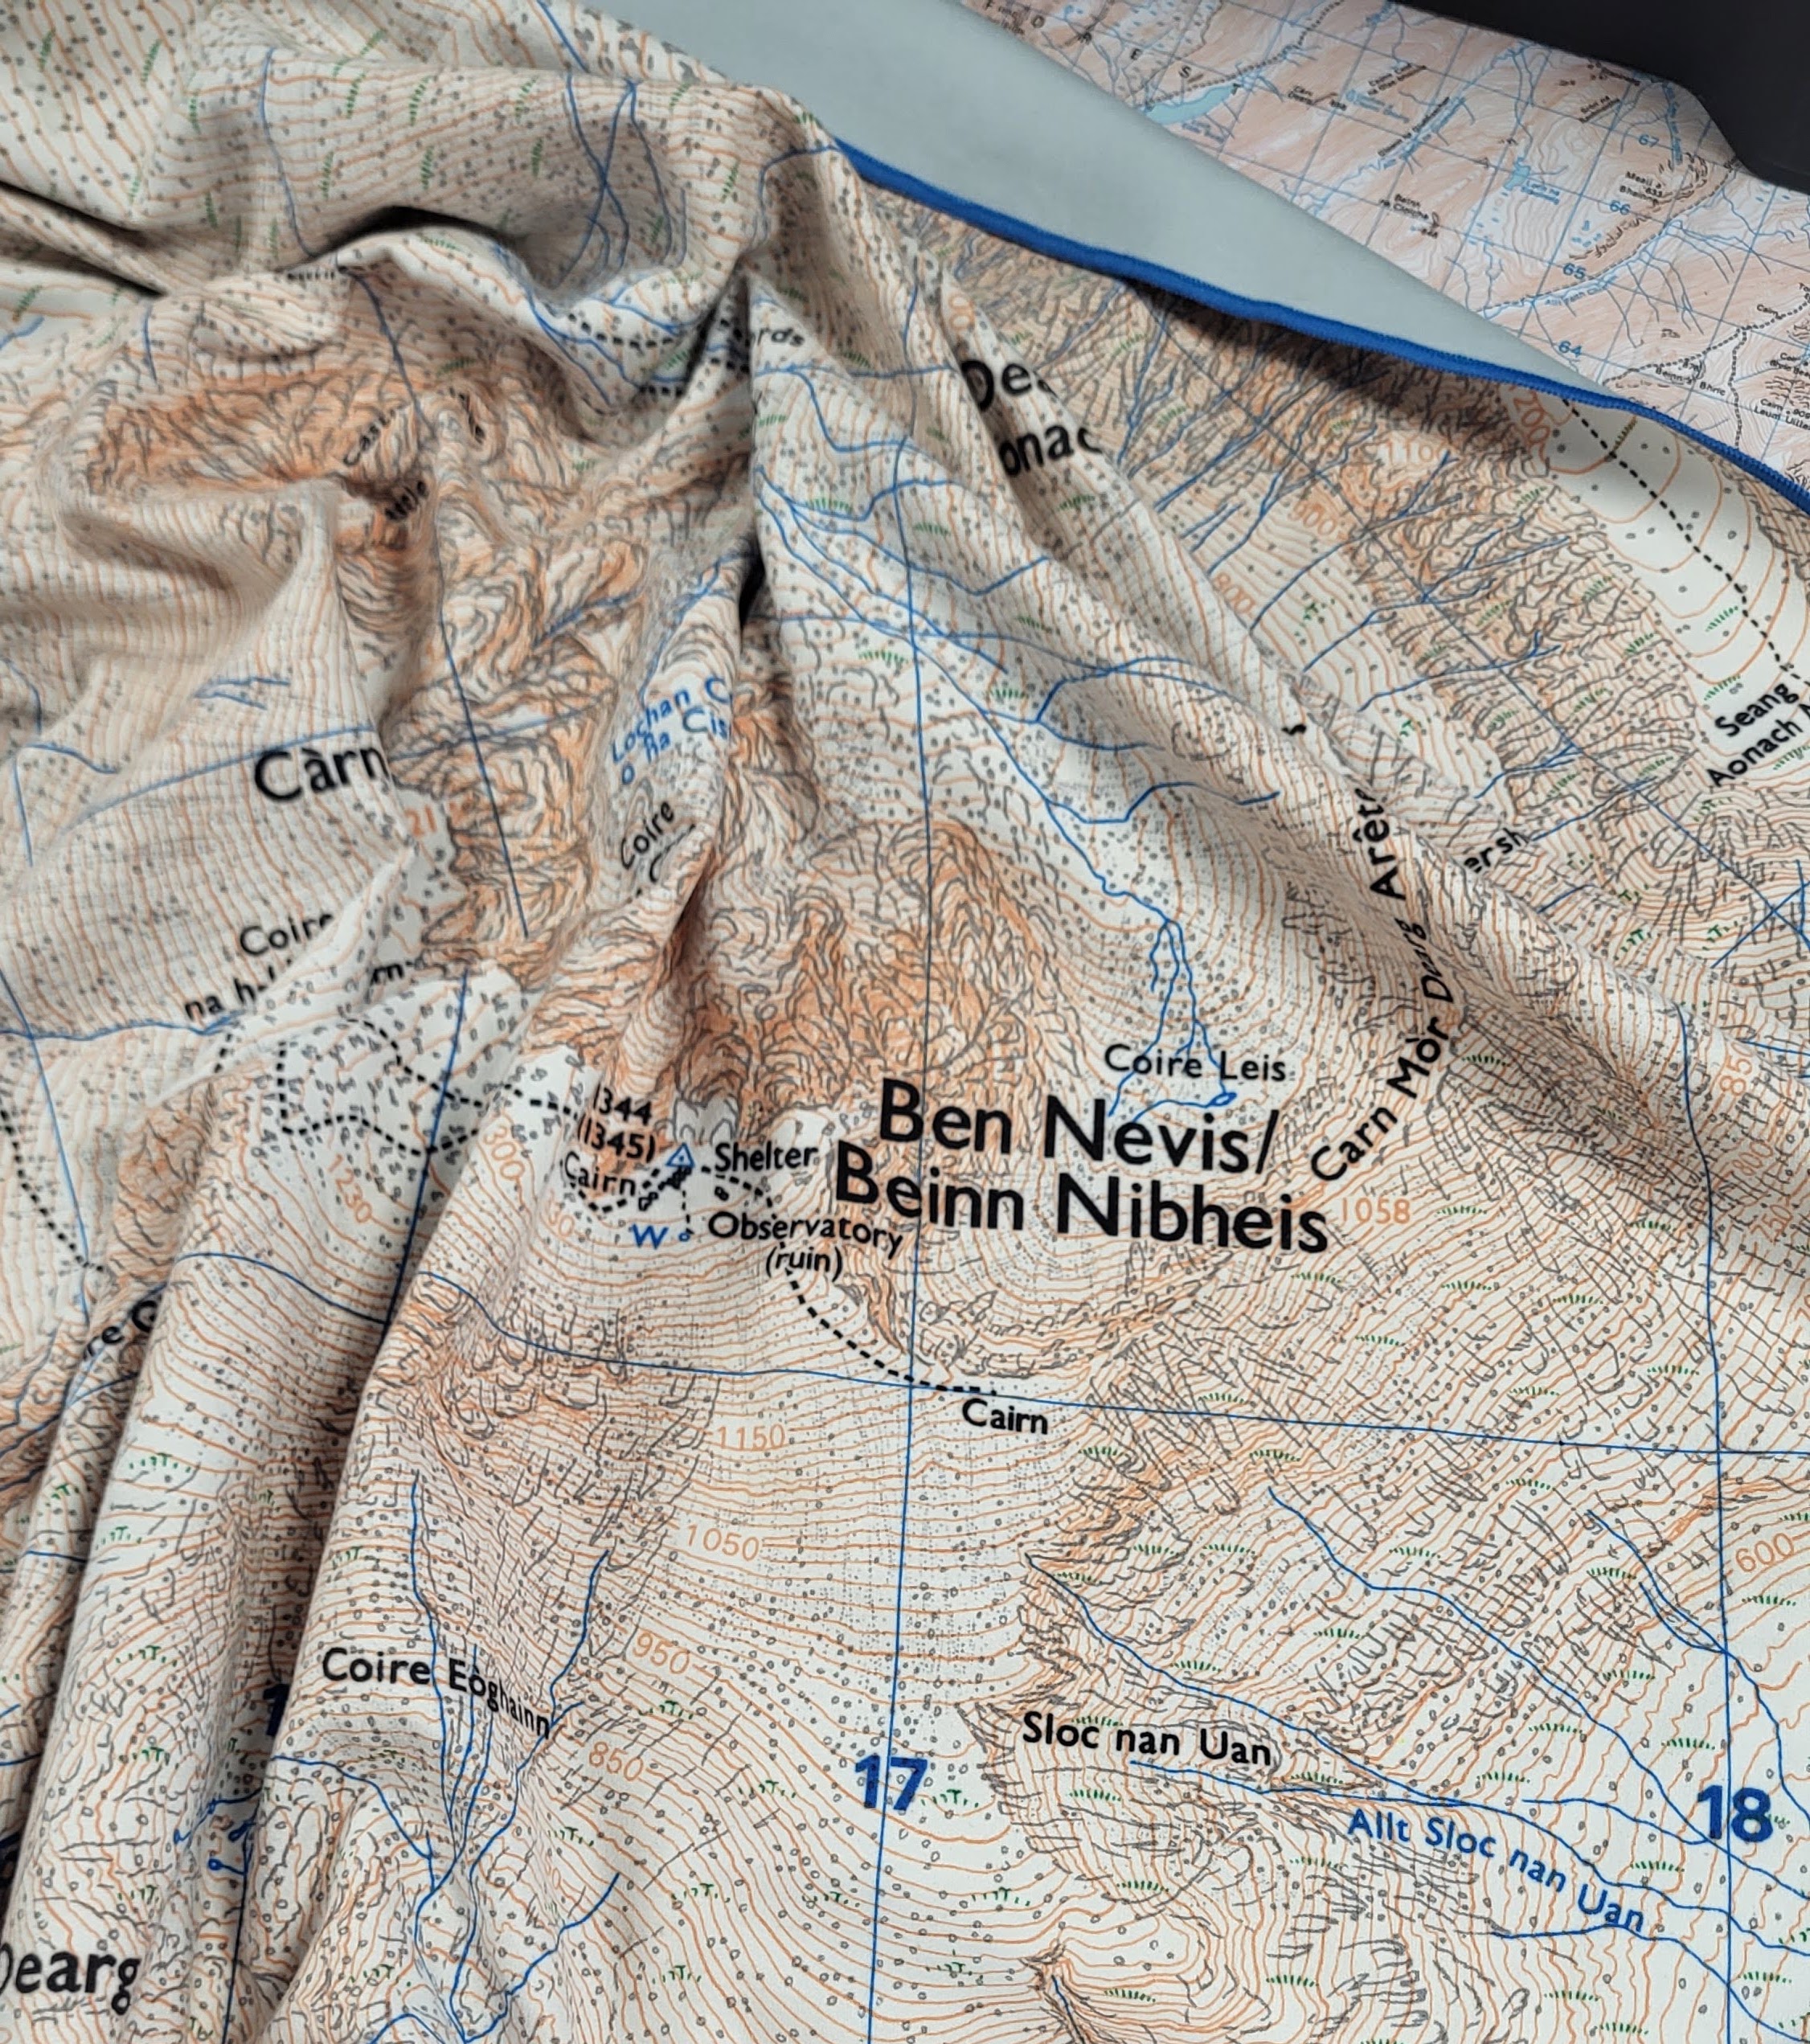
Description: This is a good learning exercise to introduce different maps to learners; maps that are common in the UK (like Harvey maps and Ordnance Survey maps) and maps from around the world. Throughout the tutor emphasizes that all maps have three things in common: map symbols, a map scale, and a north arrow. Learners will understand that although the maps vary a great deal, each has these three important features.
Begin by giving each learner a different UK map (for example a Harvey map, an OS Landranger map, and an OS Explorer map). Ask the participants to unfold the map and answer the following questions: What is the map scale? Where is the map legend or key? and, Where is North on the map? Review the learners’s answers. Use questioning to compare and contrast the different maps. How do the map symbols differ? What is the paper quality like? Are some laminated? Are some easier to interpret than others?
With regard to map scale, explain that it is represented on each map as 1cm on the left side of a colon, and a larger number (also in cm) on the right side of the colon. For example, 1:50,000 means that 1cm, measured on the map equals 50,000cm in the landscape. Explain that to convert cm to metres, take away two zeros, giving 500m. Ask the learners to work out what 1cm equals on their maps. Review the answers. Using the ruler on a compass, ask the learners to measure the distance between two objects and work out how far that is in the real world.
Collect the maps and repeat the exercise with maps from around the world. Hand out maps and ask the learners what the map scale is, what 1cm equals in the real world, where is the map key and where north is on the map.
Map Puzzle Relay – Learners become familiar with the features of a map: the north arrow, map symbols, the map key, and the map scale. Learners can interpret map symbols using a map key. Learners can set a map to the north.


Resources: Map puzzles. Print off a variety of maps, laminate them, and then cut them up. Compass.
Description: This is a good game to introduce the key features of maps, or as a starter activity. Organize your participants into two teams. Lay two sets of map puzzles at the end of a hall or in an area of green space. The team’s team gather at the other end of the hall. Instruct the participants that the goal is to run, one at a time to the end of the hall, pick up one puzzle piece, then run back and tag the next person. The next person then runs and collects another piece. Meanwhile, the rest of the team begins to fit the puzzle together. The team to complete the participant first wins.
Once finished spend some time with each team asking them questions about the key features of the map: Is there a north arrow, what is the scale, where is the map key or legent? Then one can begin asking the participants to identify different map features; for example. Can you find a road, a stream, a path, some woodland, a building?
Lastly, now ask the participants to set or orientate the map puzzle to the north. Instruct the participants to use a compass to work out where north is, then rearrange the puzzle so that north on the map puzzle matches north on the compass.
Map Symbol Games: Learners can interpret a map map symbols.
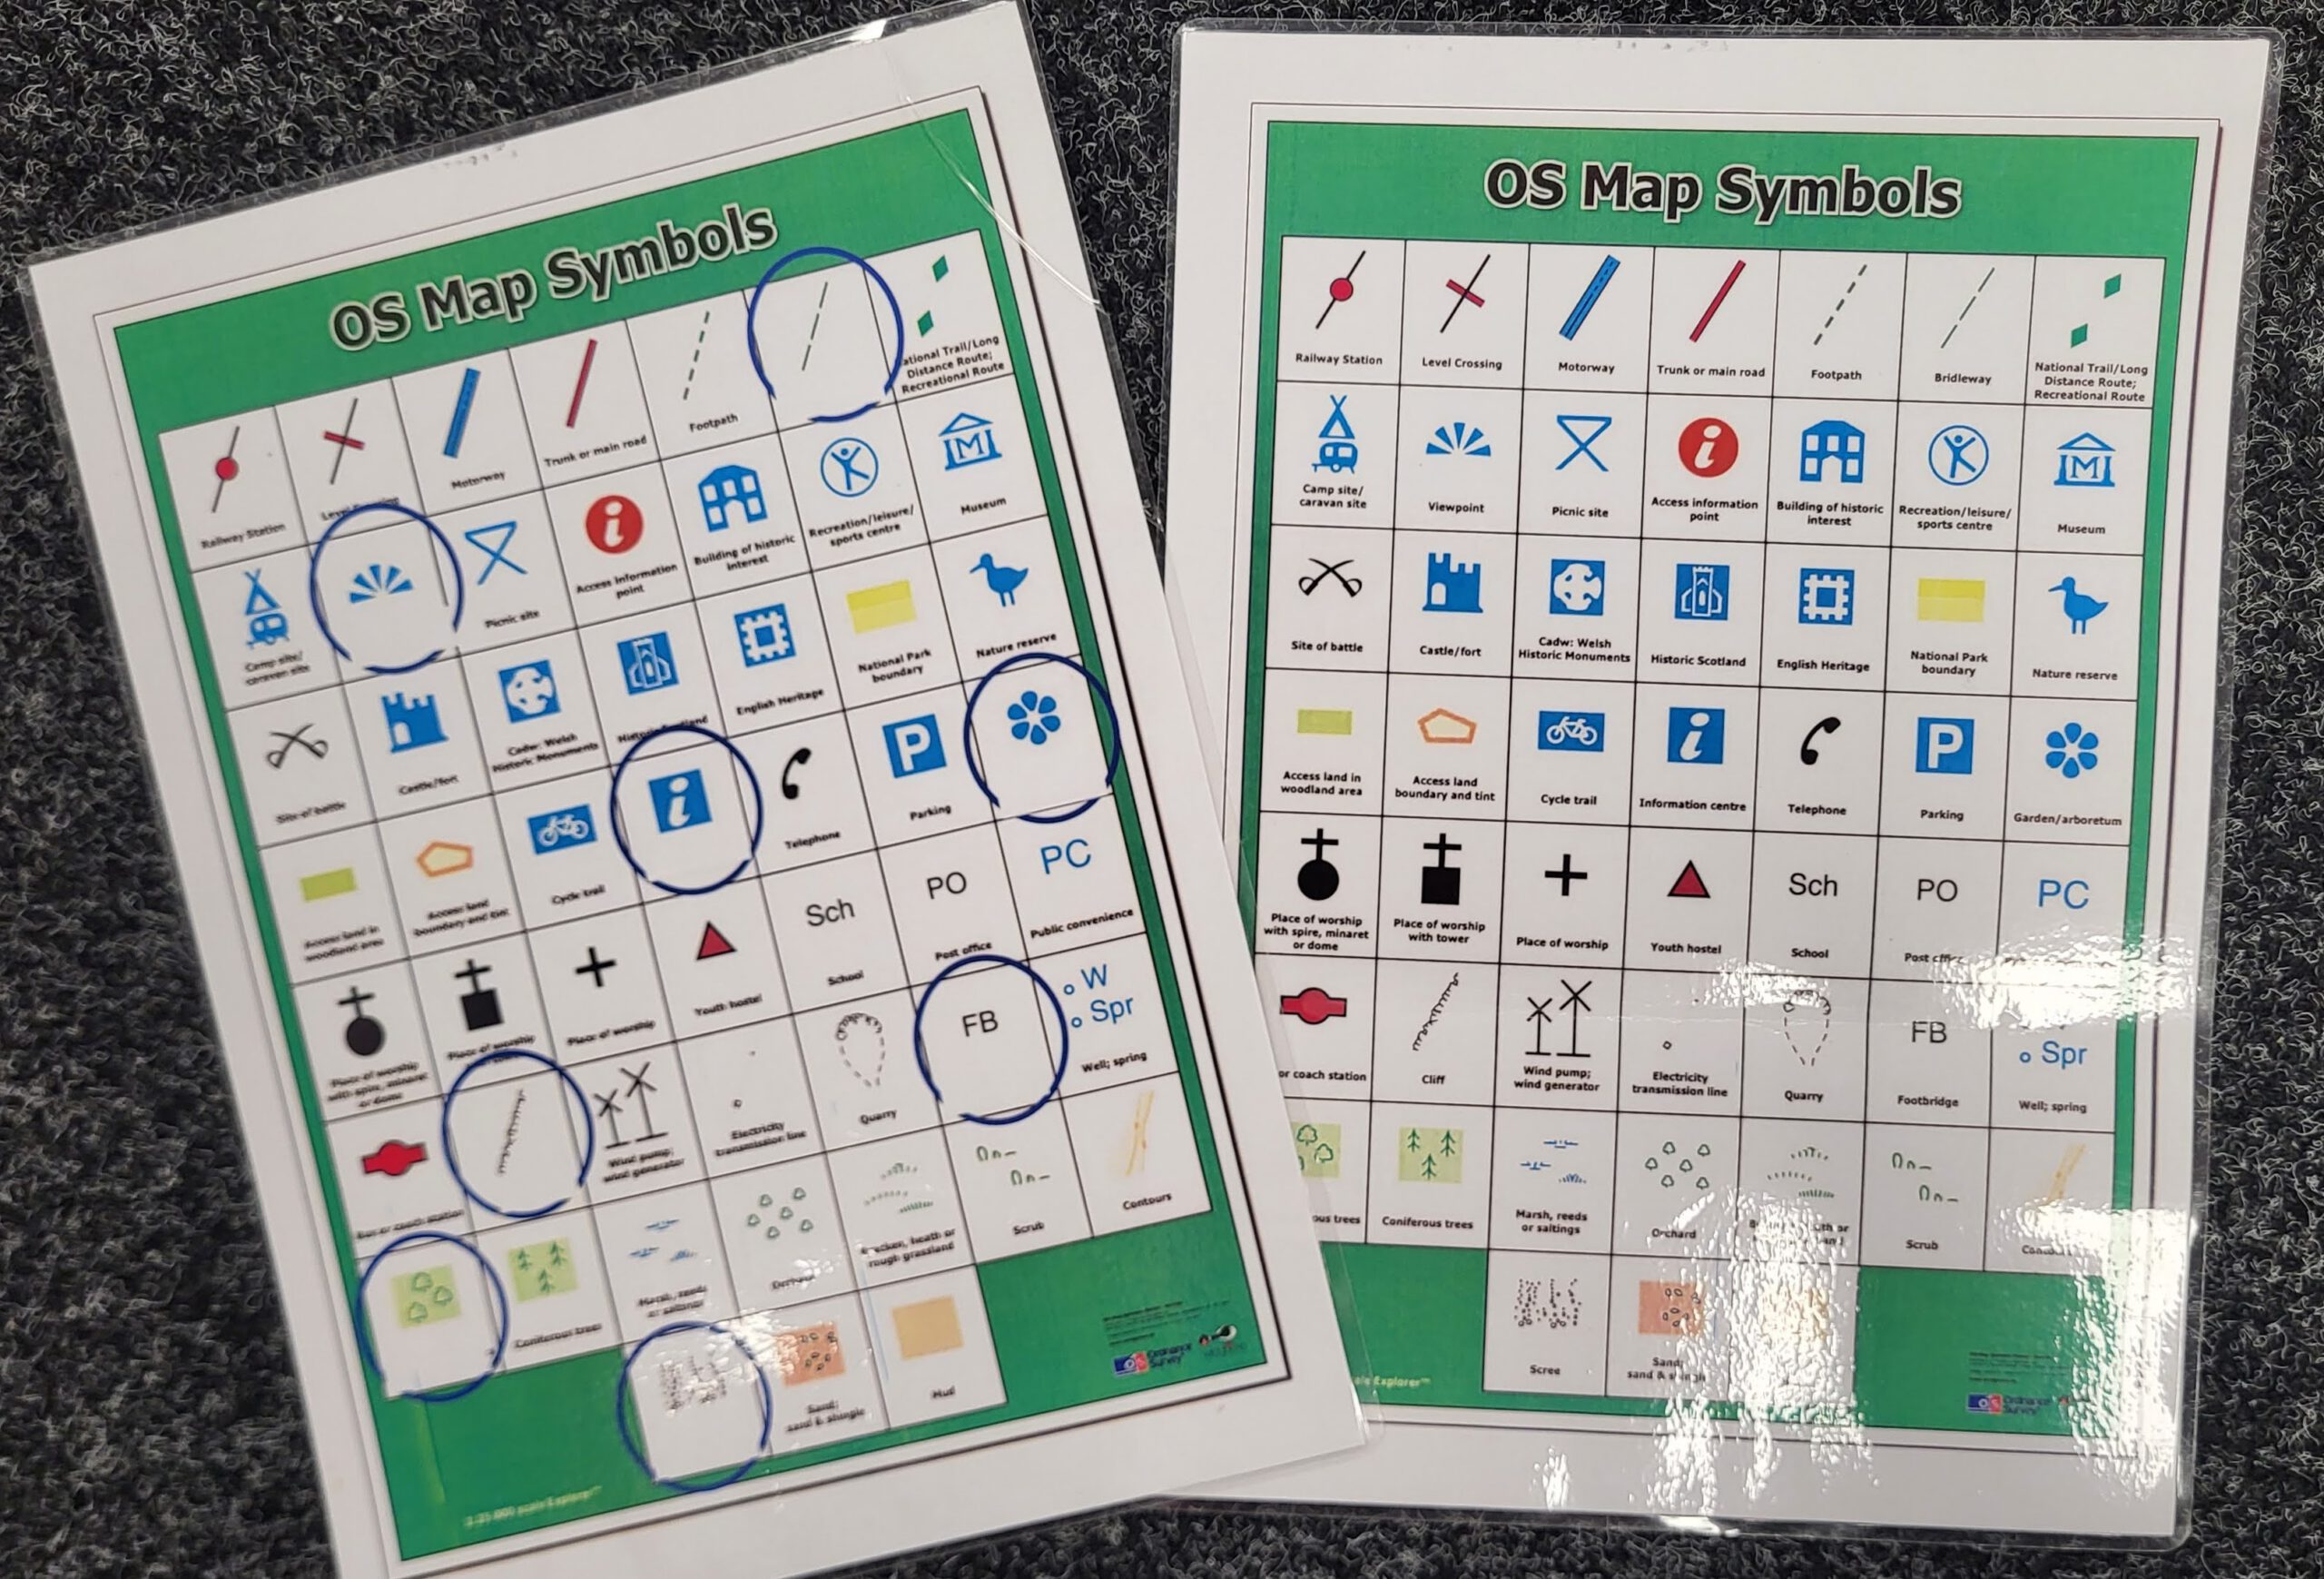
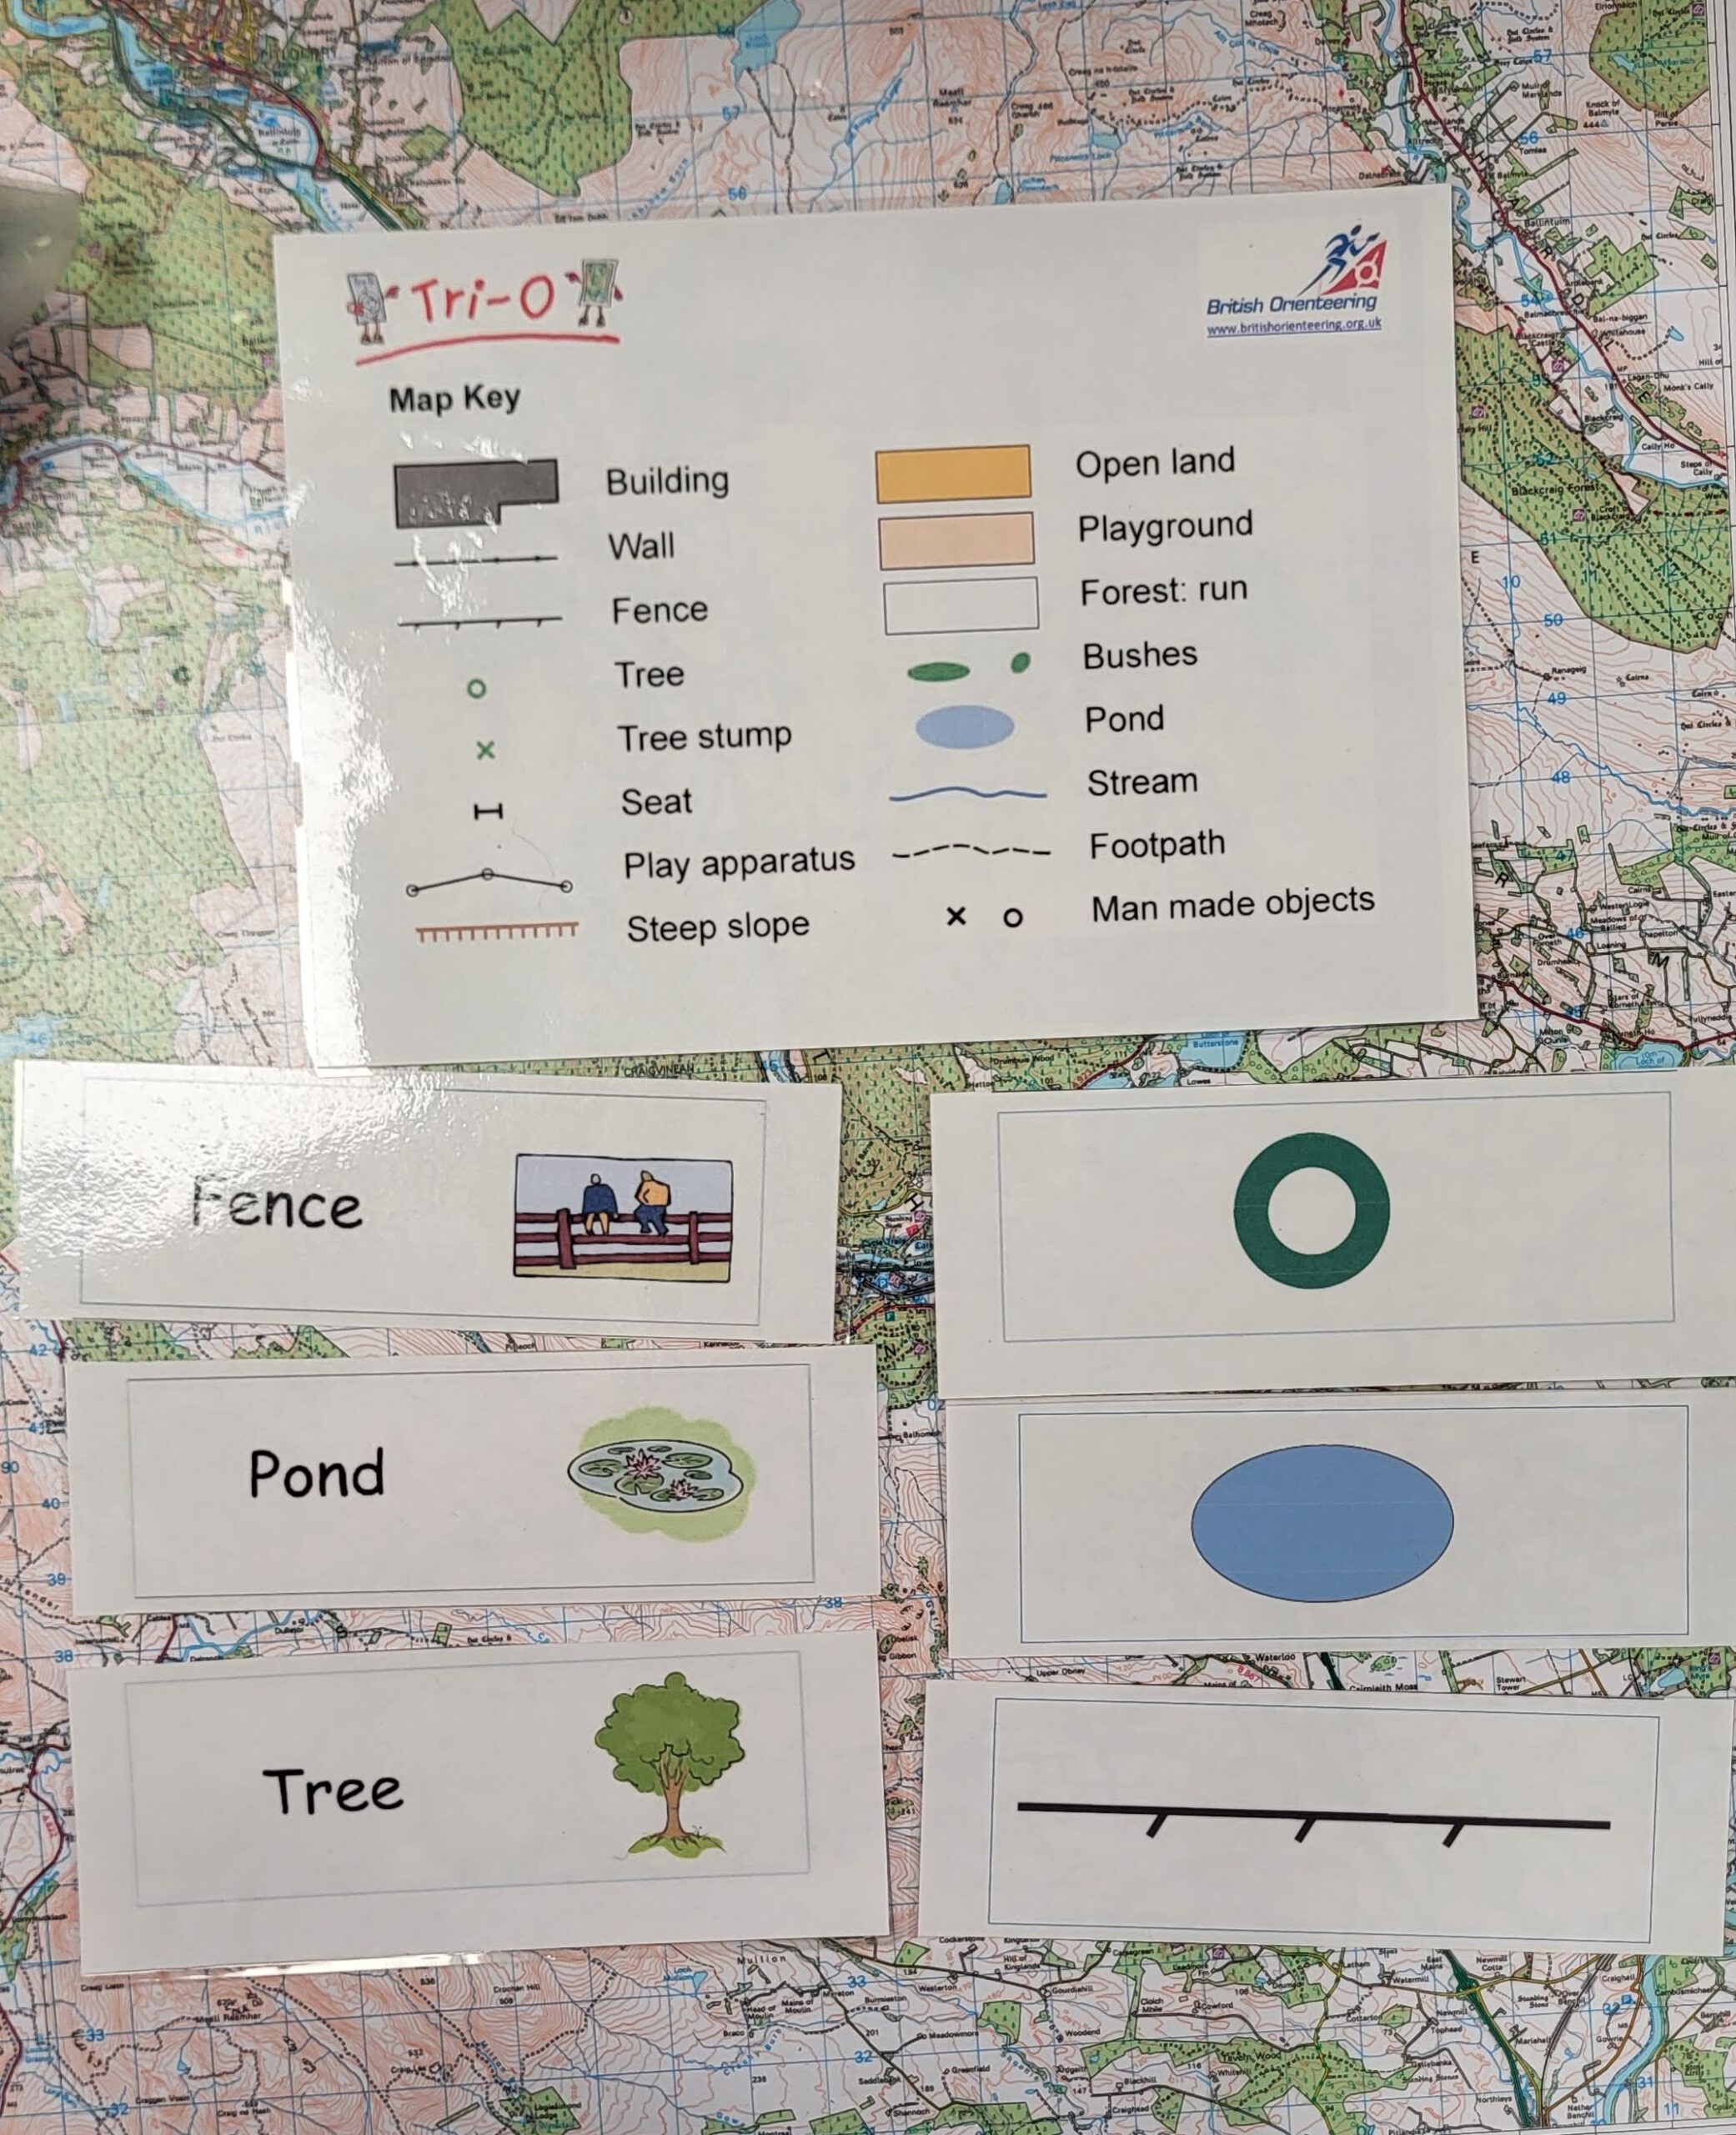
Resources: Laminated Map key and map symbols.
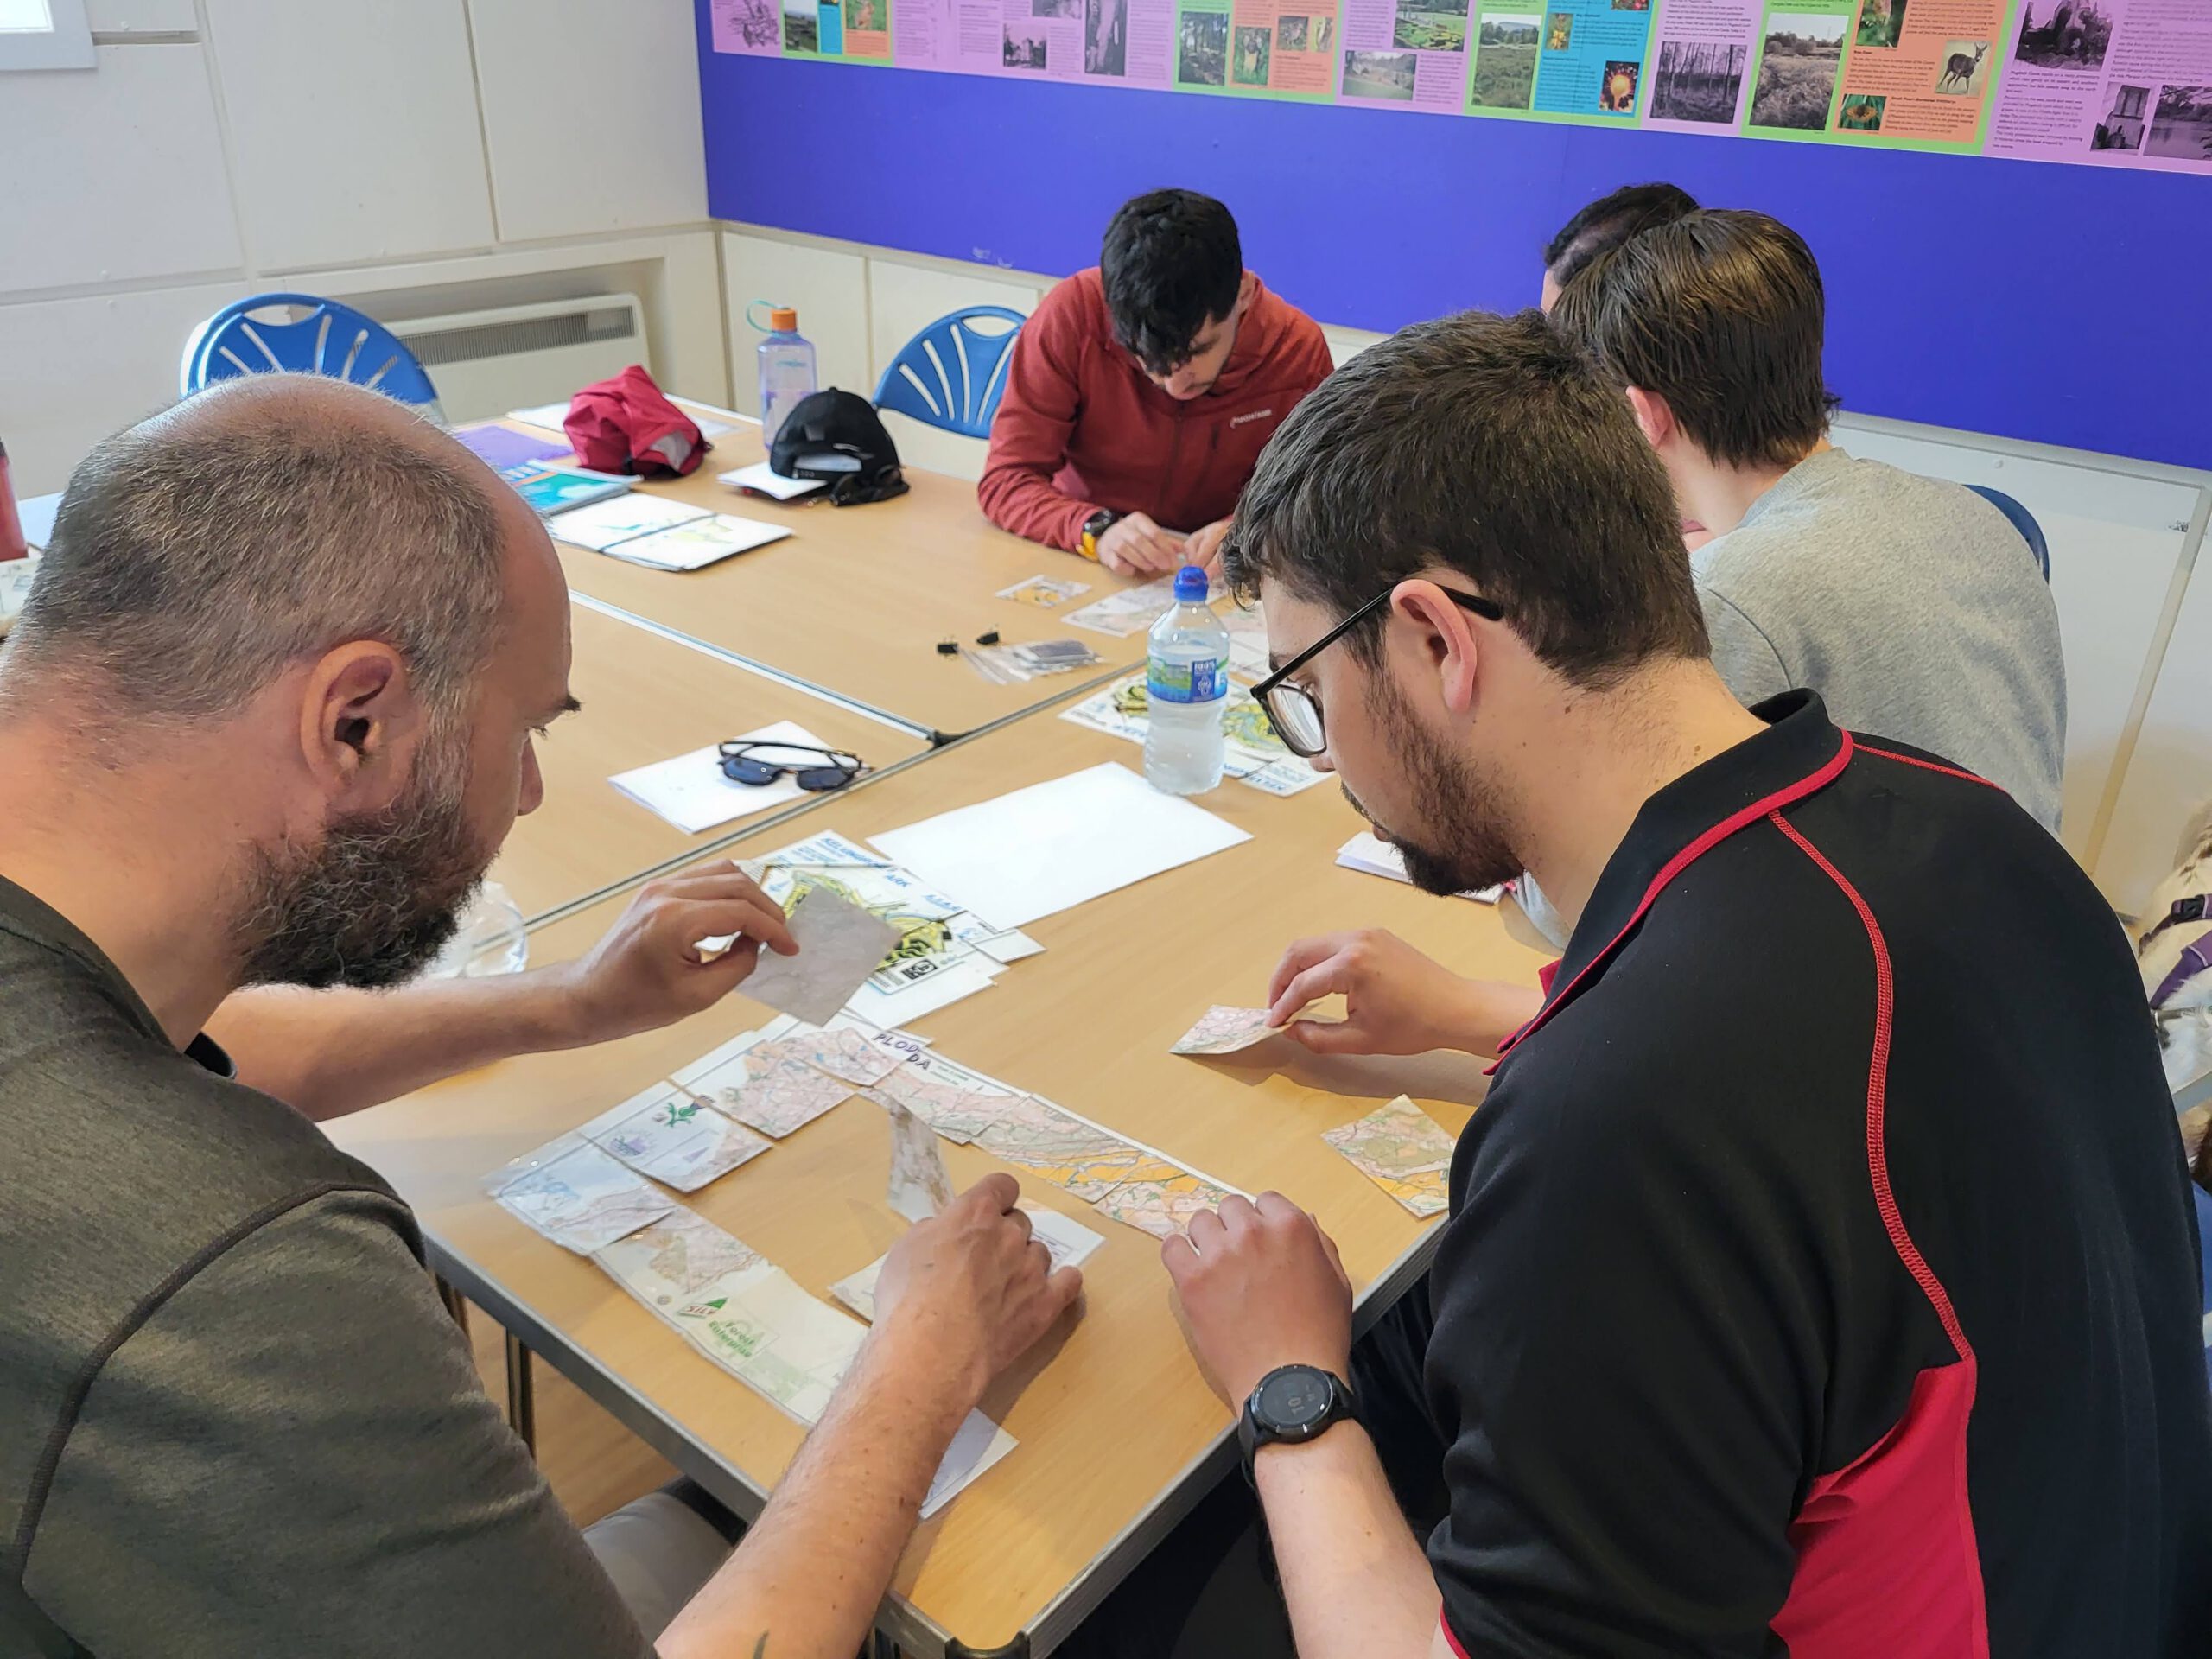
Description: Two games are described here. Both are introductory games, to introduce map symbols. The first games use two sets of map legend cards. Each set has one map legend card with a complete set of symbol descriptions and a second with missing descriptions. The game can be played as a competitive relay race with two teams of participants. The complete map symbol card is put at the end of a game hall. The map symbol card with missing descriptions remains with each team. The object of the game is to work out the missing map symbol descriptions, running, one team member at a time, to the end of the hall to read and interpret the complete map legend card. The team that gets all the answers first wins.
The second game is a simple map symbol, map symbol description matching game. The tutor keeps the map legend (which is the answer) and asks the participants, working as a team to determine what each map symbol means. Explain that many symbols will look somewhat like the object or landscape feature they are intended to represent. Others, however, don’t and are harder to interpret. Ask the participants to match up the easy ones first, and try and work on the remaining ones by elimination. Once complete the Tutor shows the participants the map legend card and uses it to review the answers.
Additional Map resources: Other resources, useful for learning about maps are: grid reference worksheets, a big map towel, a variety of orienteering maps, and postbox maps.
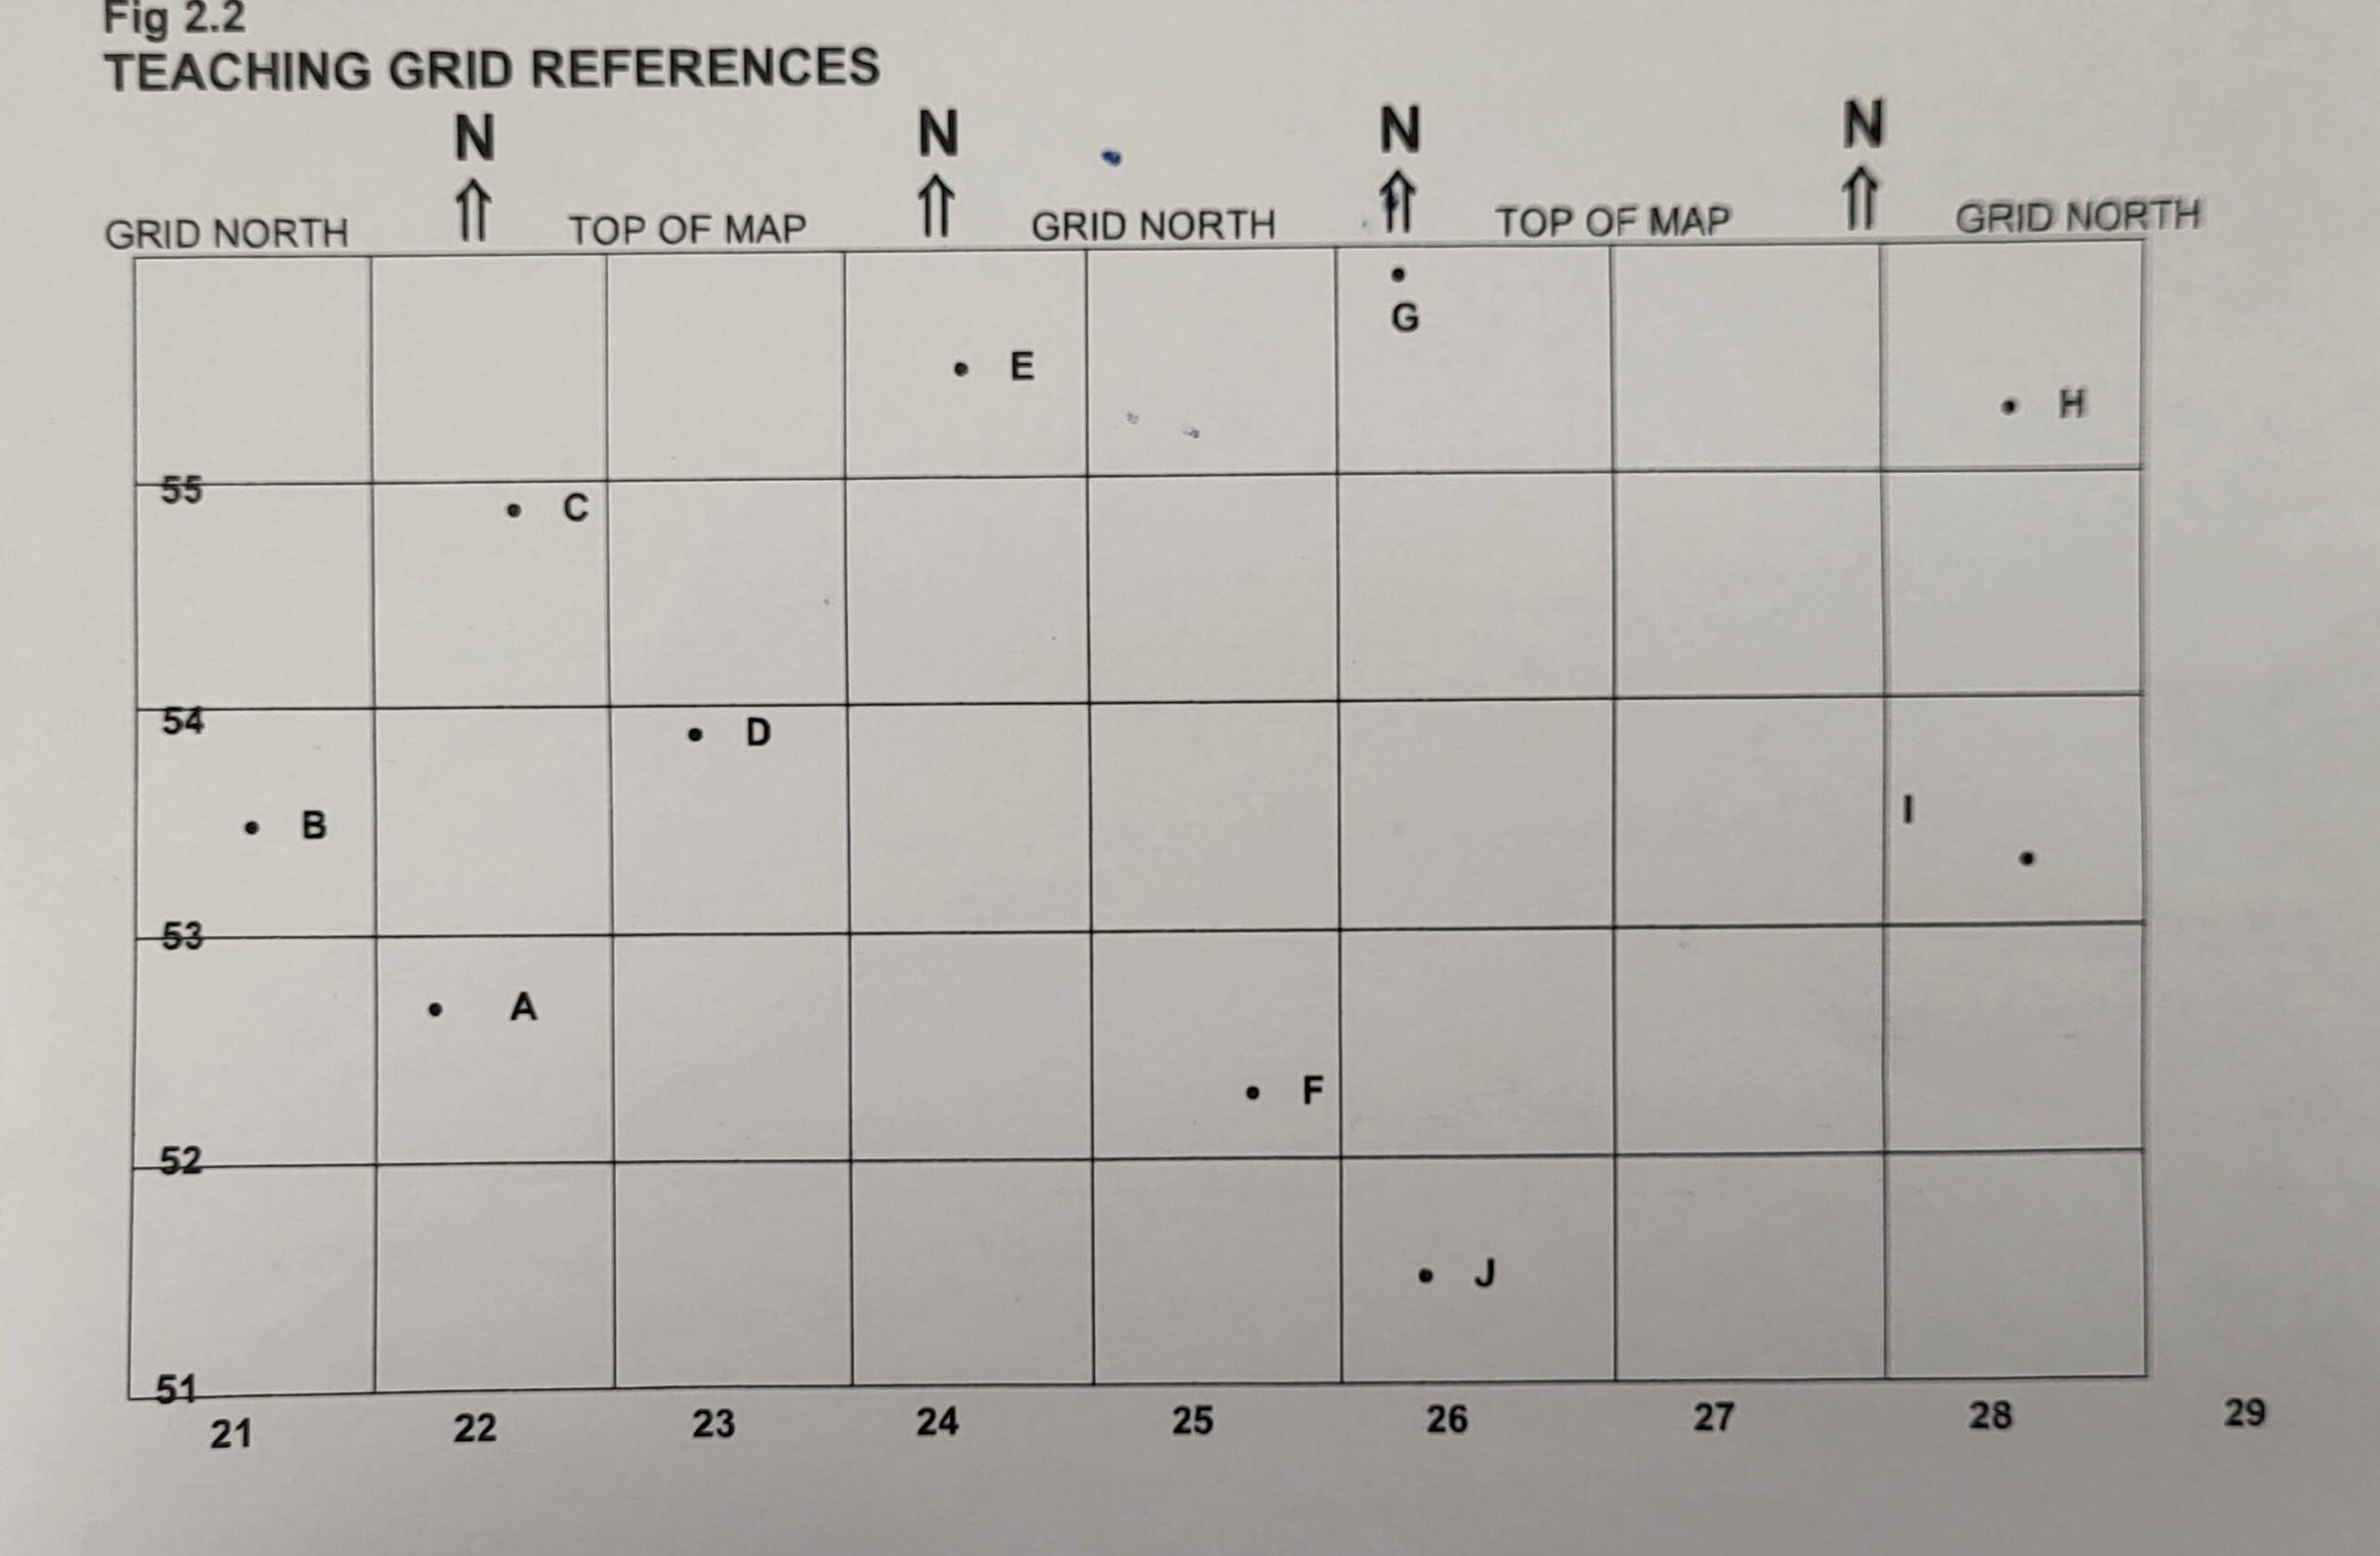
Grid Reference worksheets: these can be used as part of a lesson where your intention is to teach grid references. Begin with four-figure grid references, then six-figure grid references, then progress to working out six-figure grid references using ordnance survey maps or Harvey maps.
Map Towel: a large towel map, or any large map is excellent for teaching map symbols with a group. Lay the map out on a big map and, through, questioning, ask the participants to identify different map symbols: a bridge, a road, a path, woodland, a loch, a ring contour, a steep slope, a flat area, etc.
Variety of orienteering maps: Using a variety of orienteering maps is an excellent way to develop navigation skills. Orienteering maps are packed with detail and are usually mapped at a smaller scale; e.g. 1:10,000, which means participants can do lots of navigation legs in a small area. Orienteering maps can be bought by orienteering clubs. One can also use this website https://oomap.dna-software.co.uk/. This is a free map resource with orienteering map layers for the entire UK. Maps can be printed at a variety of scales; and controls, start-finish points, and control descriptions can be added.
Post box maps: The https://oomap.dna-software.co.uk/ has the functionality to add, automatically, all of the post boxes in an area. One can produce maps of an urban area; for example, in the neighbourhood of a school, with the locations of post boxes. One can then run an orienteering session where participants navigate to post boxes.


Learning about contours
Contours with Ropes: Learners can lay out contour lines on a slope and representing different slope shapes: spur (a small ridge), reentrant (a small valley), a ring contours (hill tops/a knoll), steep slopes and gentle slopes.
Resources: Two 30m roles and two walking poles. Also a greenspace with slopes
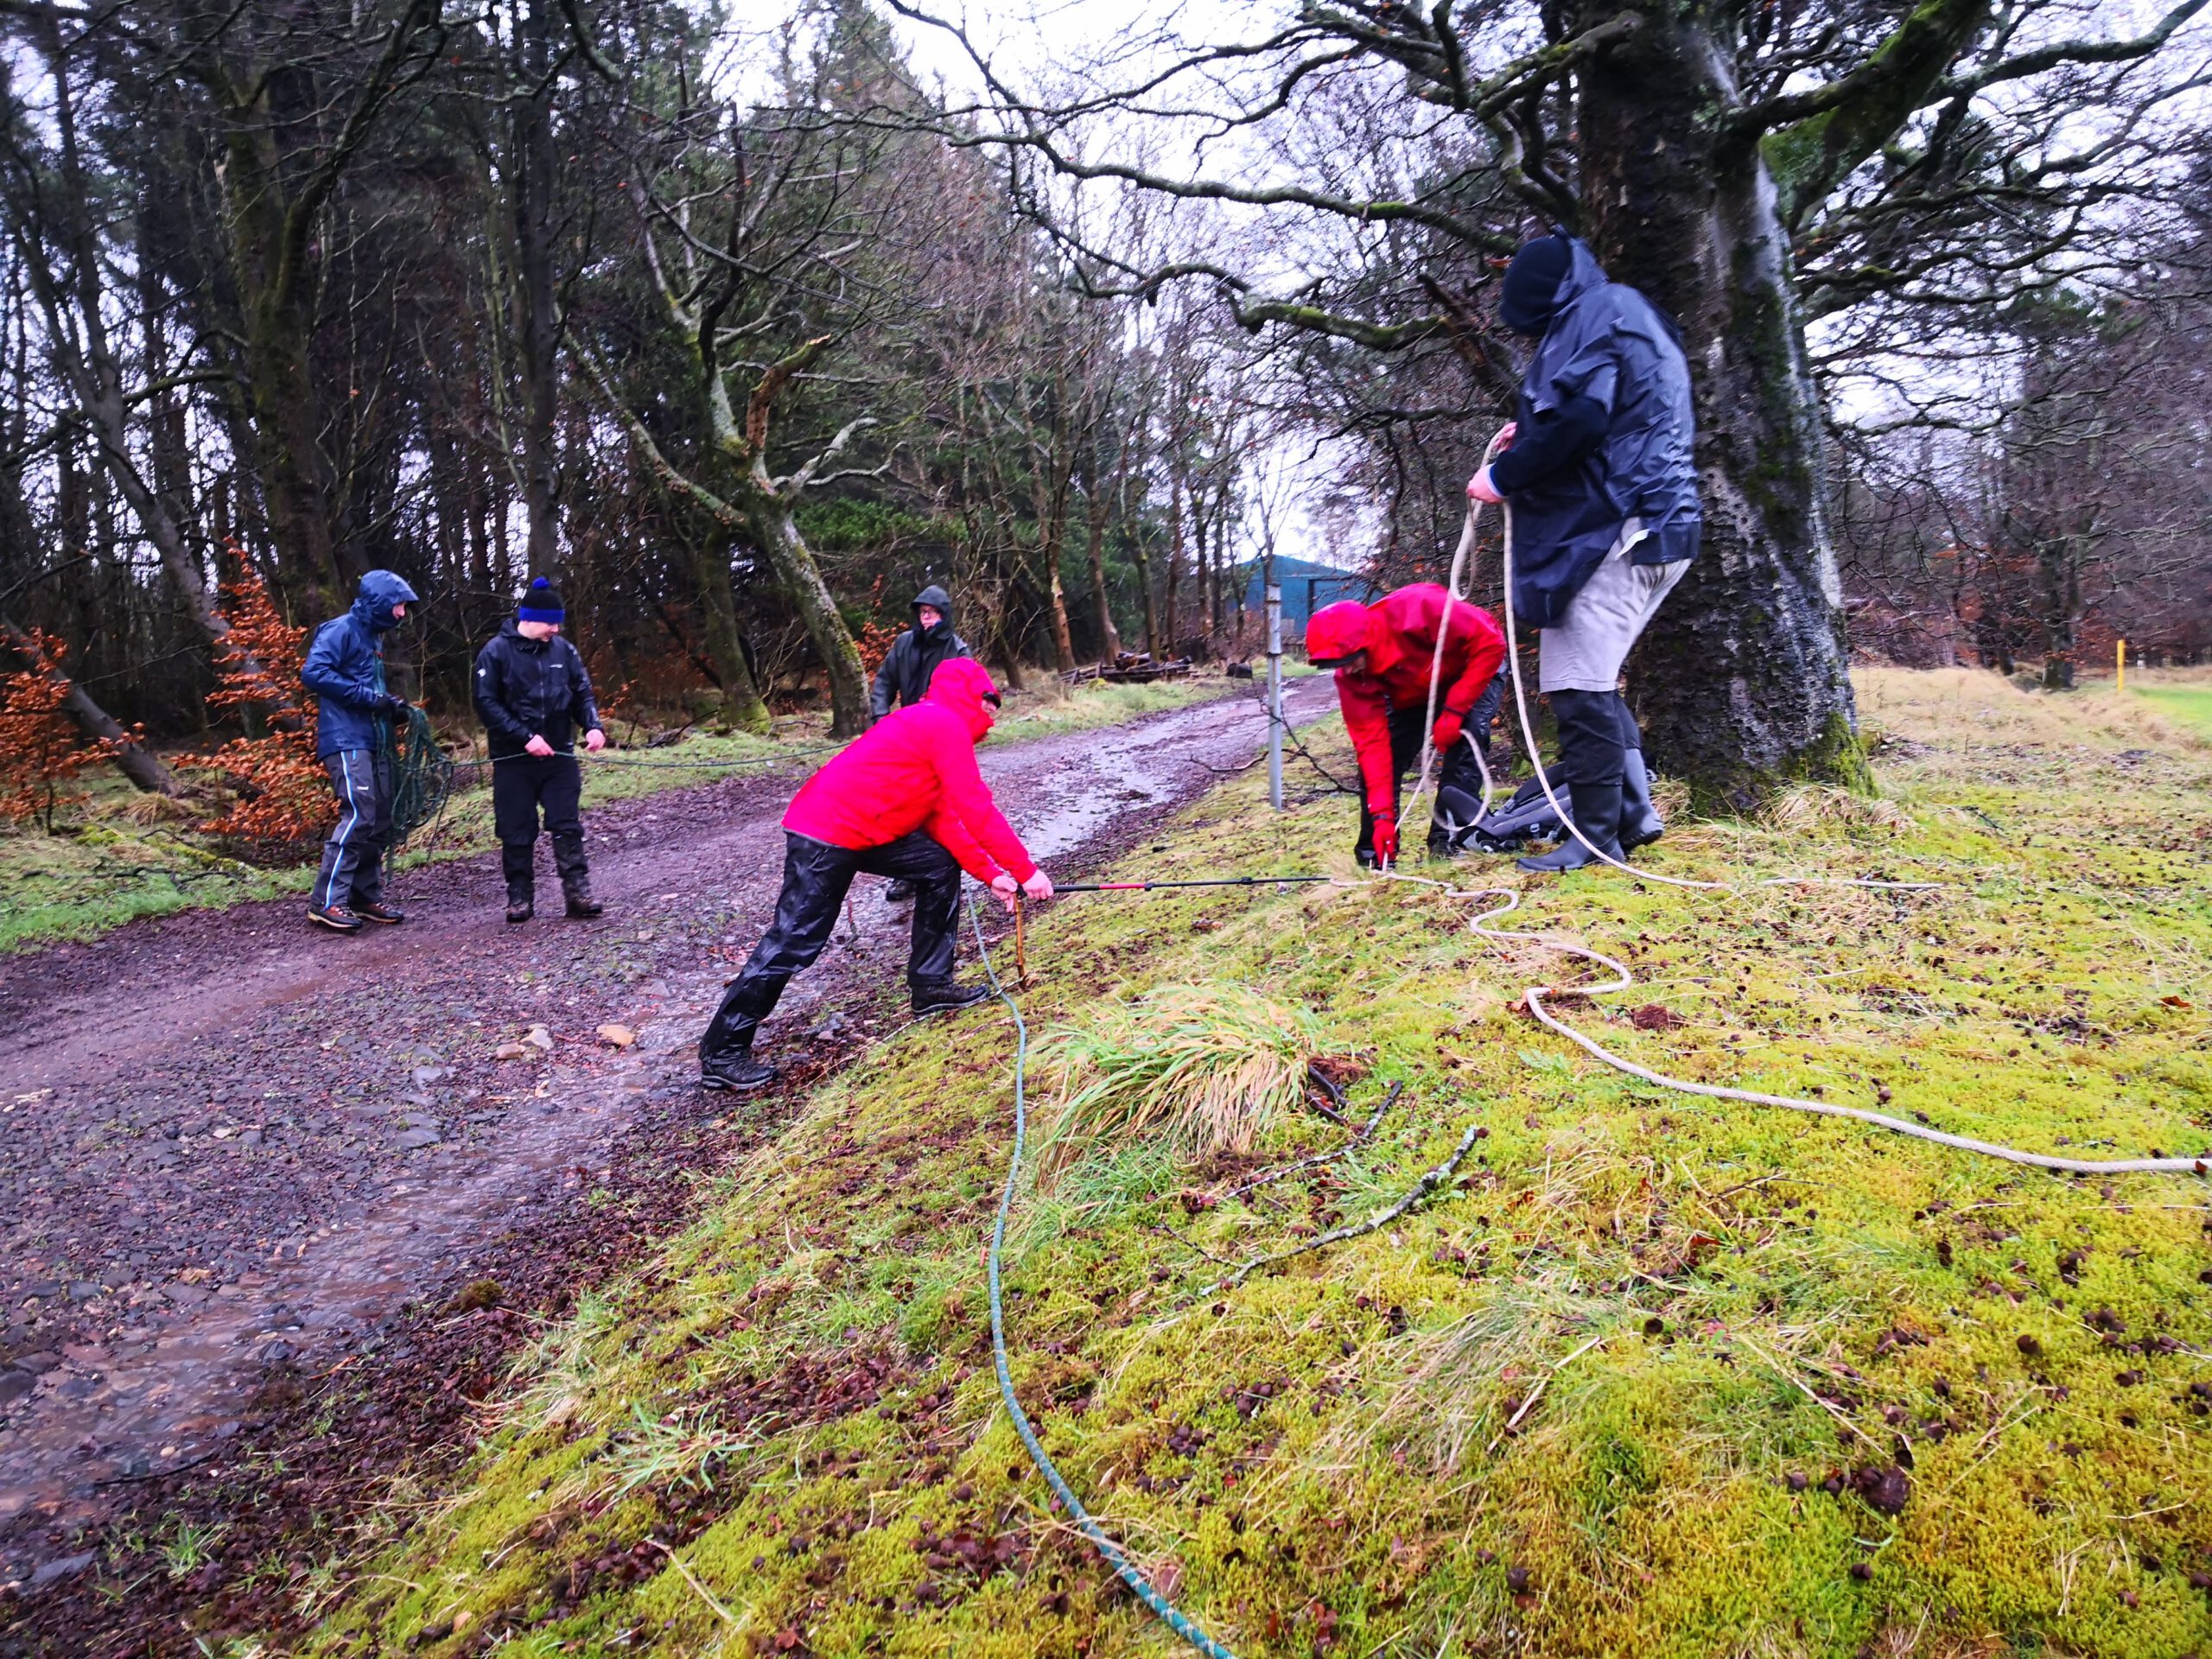
Description: This is a good exercise for introducing the concept of contour lines to learners for the first time. It helps participants visualize or interpret the shape of the ground from contour lines. First explain that contour lines are lines that join up points exactly the same height above sea level. Go to an area of greenspace with slopes (ideally slopes with spurs, reentrants, steep slopes and gentle slopes). Now organise your participants into two teams. The first team works together to lay out the rope, across the slope, ensuring that the rope remains entirely flat, neither going up or down. The second group now lays out a second rope below the first one. Two walking poles, one short and one long, can be used to lay out the second rope a consistent height below the first. Once complete as the participants to stand back and ealuate the rope contour lines, are the entirely level, do they need to make adjustments? Review with the group how the contour lines have changed in relation to different slope shapes: steep slopes, gentle slopes, hill tops, reentrants and spurs.
Contour Models: Learners can identify a ridge, a valley, ring contours, steep slopes, gentle slopes, a col (or saddle or bealach), and flat areas.
Resouces: Home made or bought contour models.
Description: Contour models are usful resources for helping learners to visualize or interpret the shape of the landscape from contour lines. Through questioning ask the participants to identify a ridge, a valley, ring contours, steep slopes, gentle slopes, a col (or saddle or bealach), and flat areas.

Contour Matching Game: Learners can interpret the shape of the landscape using contour lines. Learners can use geographical vocabulary to describe the shape of the landscape.
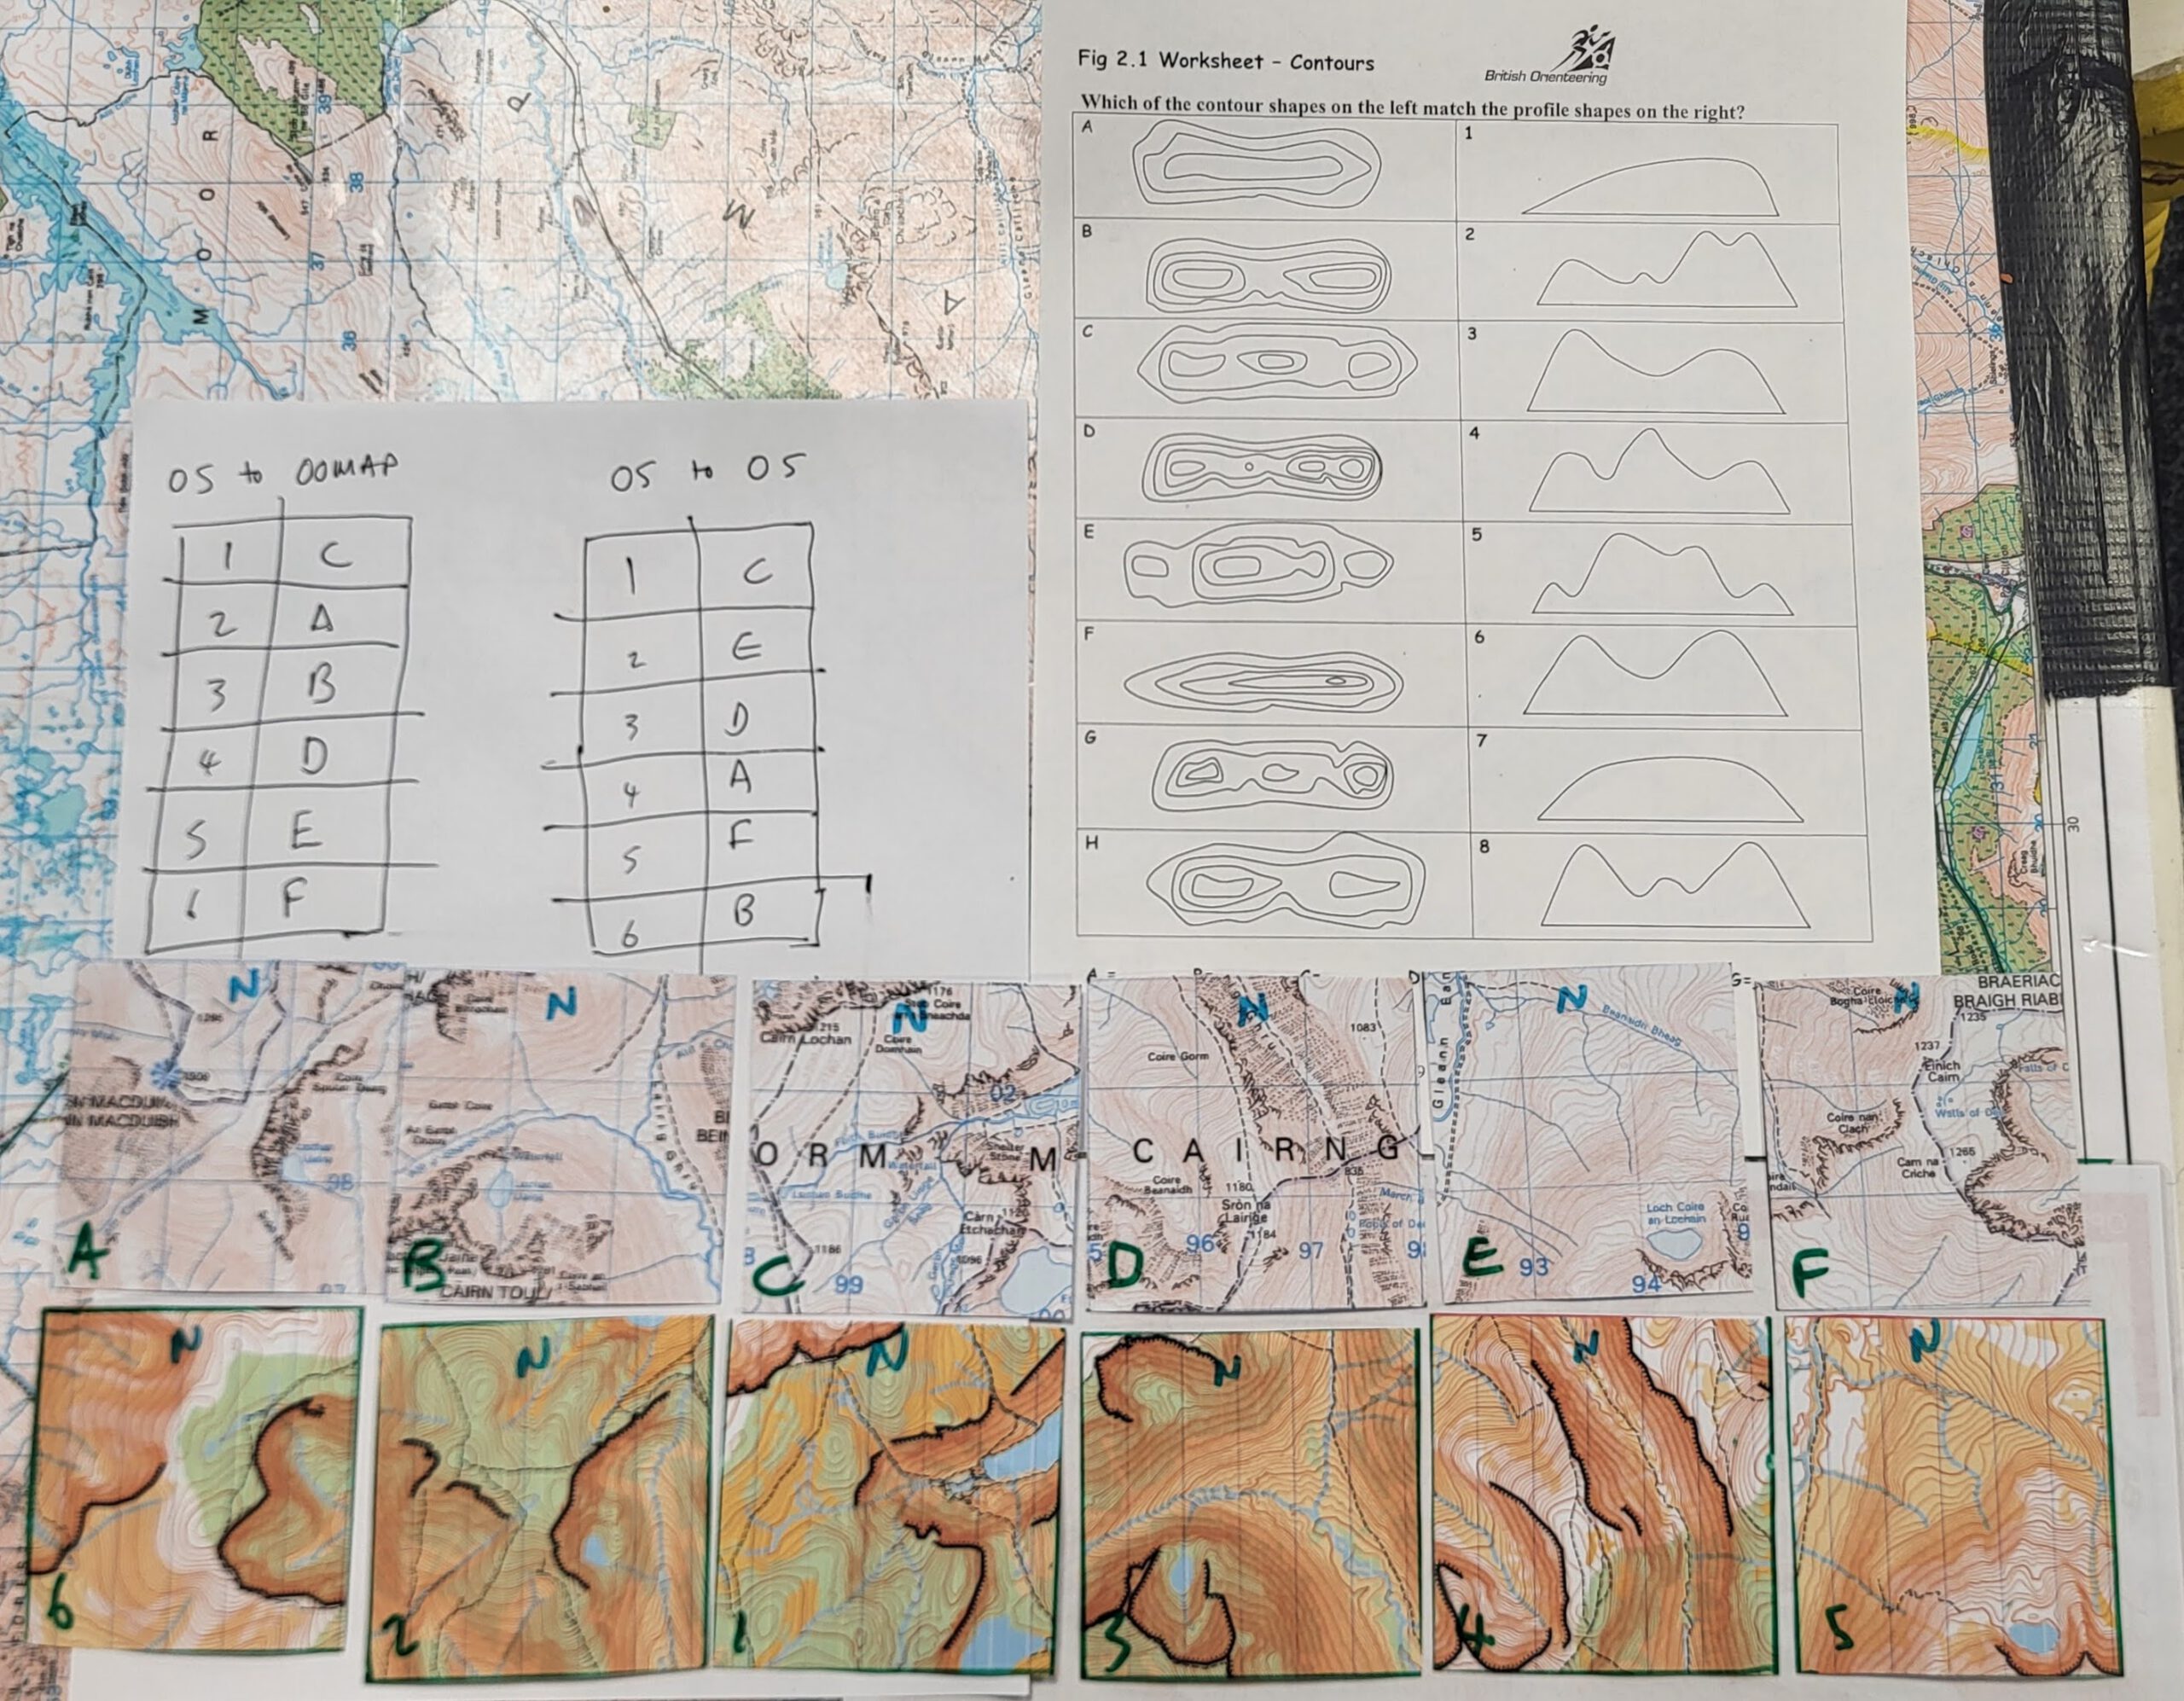
Resources: Two sets of six small maps. Both sets of maps must represent the same areas. Number and letter the maps randomly (e.g. 1,2,3,4,5,6 and C,A,B,D,E,F). One set of maps can be OS maps and the second contour only maps. Both sets of maps must be the same scale and north should be clearly indicated.
Description: In a classroom, clear a space in the middle of the room and place a table at one end and a second table at the other. Lay out the six numbered maps on one table and the lettered maps on the other. Participants then get a bit of paper and draw a two column, six row table on it. Participants now move between the two tables and the two sets of maps and try to match up the respective maps. Participants must not pick up or move the maps.
A progression is a game where the learners need to develop and use their understanding of geographical language to match up the maps. Begin by explaining geographical terms used to describe the shape of the ground; for example, a valley, a hill, a ridge, a steep slope etc. Split the learners up into groups of two. One of the group partners stands beside the numberd maps and the other beside the lettered maps. The partner standing beside the numberd maps looks at one of the maps and memorizes the landscape shapes, then comes to the middle of the room and communicates to their partner, using geographical terms, the shapes on the card; for example, “there is a valley in the north west corner and a hill to the southern end of the map”. The partner then tries to identify the correct map.
Another useful resource is this contour matching worksheet.
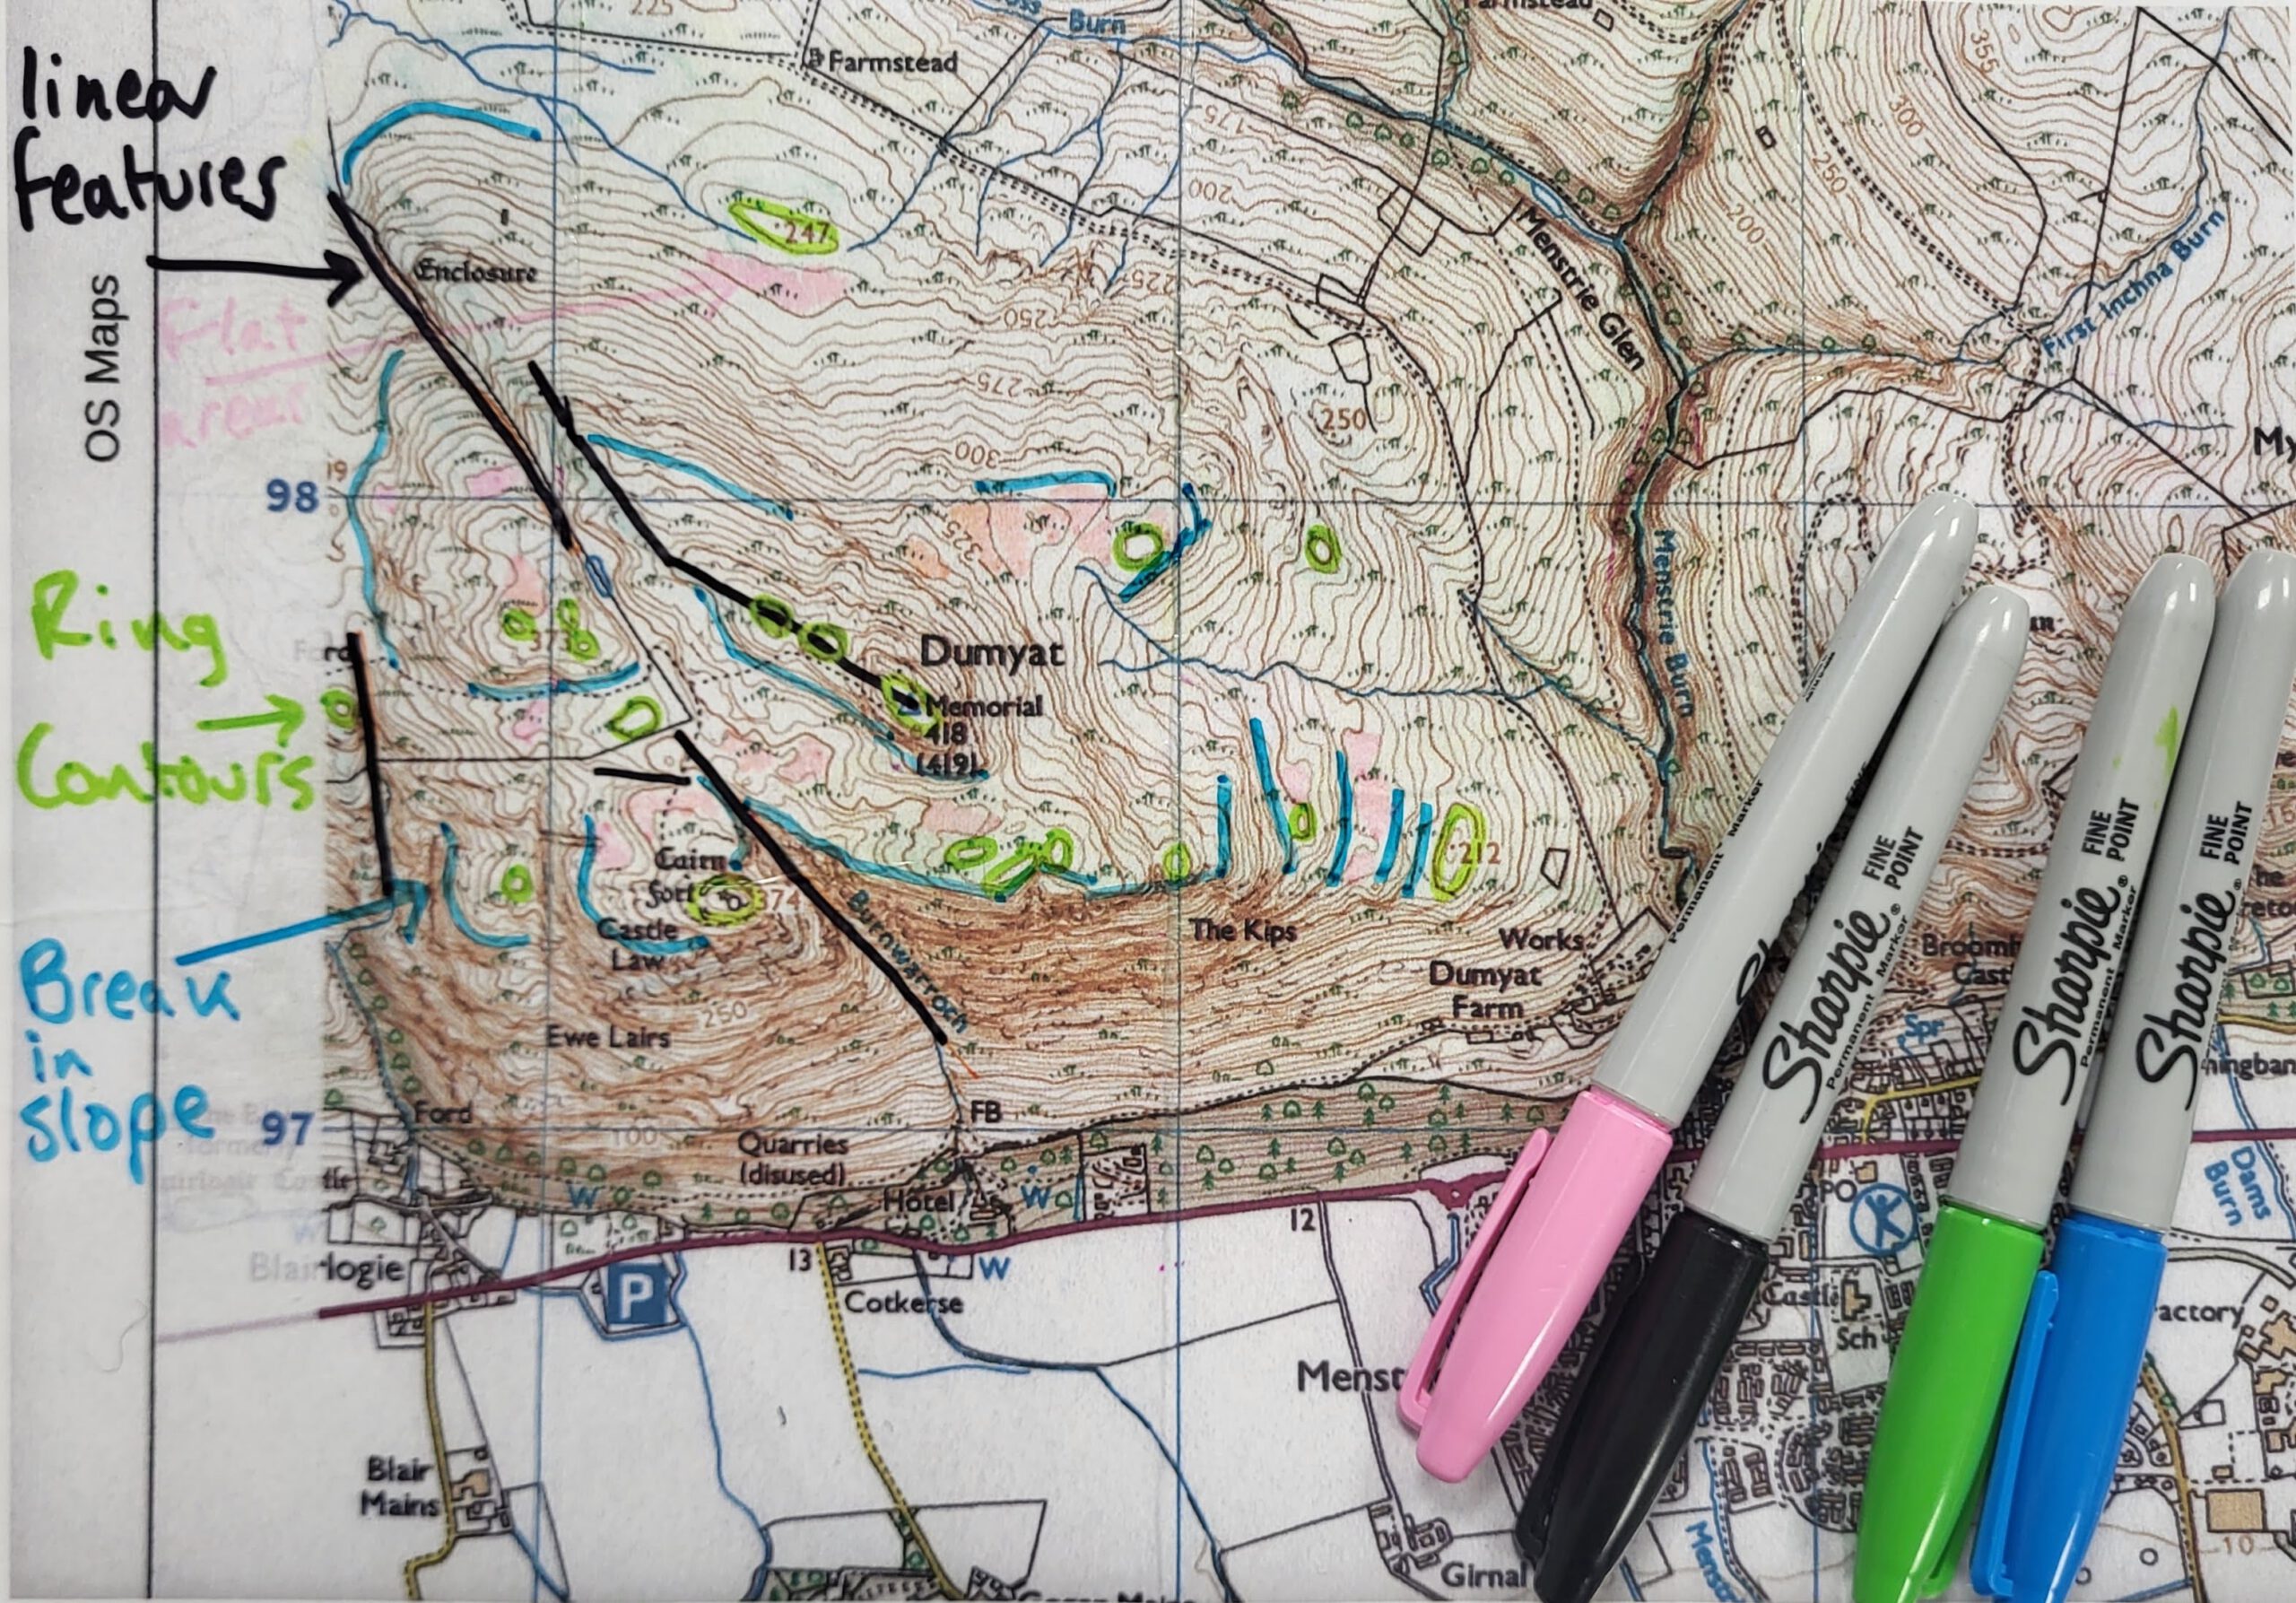
Contour Interpretation with Sharpies: Learners can identify breaks in slope, linear features (ridges, gullies) and point features (ring contours, spurs and reentrants) on a map.
Resources: Sharpies and laminated contour maps.
Description: This exercise is usful for developing contour interpretation skills and is particularly relevant for Silver and Gold NNAS participants. Each learners gets a laminated maps and three or four sharpies (different colours). Explain the vocabularly we will be using:
- Break in slope: a change in the steepness of a slope; e.g. flat to gentle, gentle to steep, steep to flat.
- Linear feature: any natural landscape feature that goes in a straight line; for example, a ridge or a gully.
- Point feature: specific ‘spot’ in the landscape formed by a hill (a ring contour), a reentrant or spur.
Ask the learners to anotate on their maps lineat features, point features and breaks in slope, using different coloured sharpies. Once finished, review the answers with the participants.
Blindfolded Slopes: Learners can feel different slope angles and can identify breaks in slope.
Resources: a greenspace with slopes. A golf course is particularly good.
Description: Take the participants to a greenspace with slopes on it. The slopes must not have any hazards, for example short grass rather than rocky ground. Split the learners into groups of two. Explain that there is a lot of value, when navigating, in being able to identify changes in slope through feel. That means noticing how slopes affect your gait and the physical demands of walking. Explain that when walking from flat ground to steep ground, learners will feel their gait (their steps) get shorter (or closer together). One partner in the each group closes their eyes and the other partner leands them, holding their arm, along and over the slopes. Participants feel for the changes in slope angle. Once done, participants swap over.
Review with the particpants how noticing slope changes is important when navigating, particularly in poor visibility. Slope changes can be very useful as ticking off features and catching features.
Learning about the Compass
9-Cone Compass Card Game: Learners become familiar with the cardinal points of the compass, and can follow directions and follow a route using compas directions.
Resources: Cones and two sets of compass cards.
Description: Lay out nine cones in a grid (3 x 3) about four paces between each cone. Make sure the cones are aligned to north. This is the same layout as the 9-Cone Setting the Map games. Explain that north is near the north pole and, irrespective of which way you face, north remains fixed in the landscape. As part of this introduction use a compass and show the learners where north is. Also explain where east, south and west is. Now everyones stands at the southern end of the cones. Split the participants into groups of two. Each group of two takes a set of compass cards (set A, set B, set C etc). Explain that one partner follows the instructions on the compass card and stands in the appropriate place amongst the cones. They they follow the compass directions, following the route to its end. The other partner remains at the southern end of the cones and checks that they go the right way. Once complete, partners swap over.
