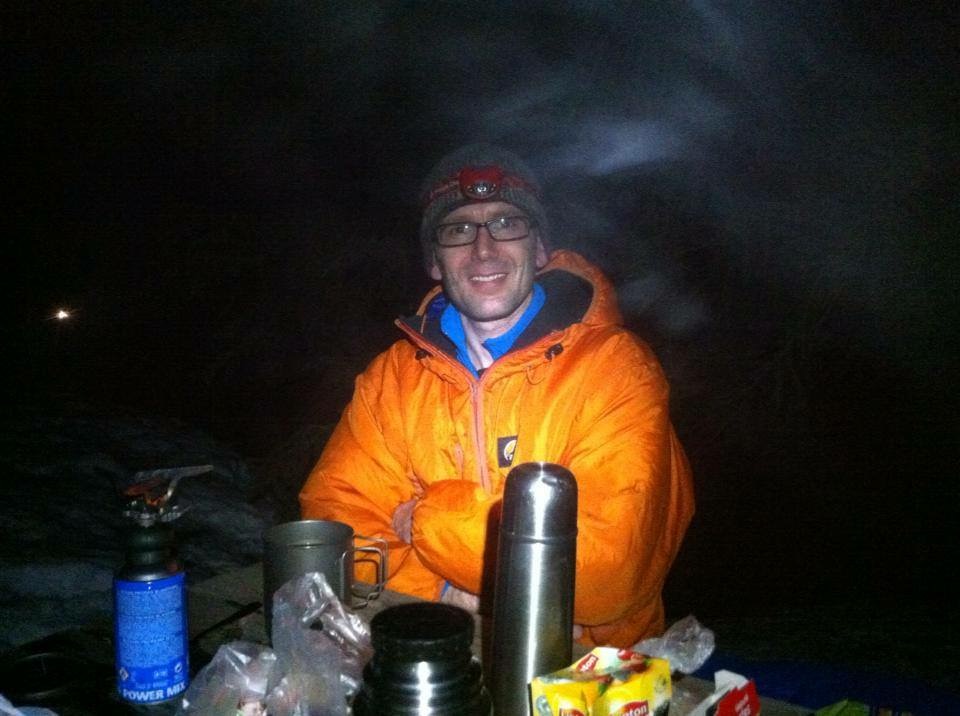
Here’s an overview of my winter kit for hillwalking in Scotland. In working out what works for me, I learnt a lot from others, particularly instructors at Glenmore Lodge, Scotland’s National Outdoor Training Centre. This blog article is intended to give you ideas so you can decide what winter kit and equipment works for you.
There are lots of choices for winter clothing and equipment: lots of brands, different materials, expensive options and cheaper ones. Winter weather can vary too: you can get cold, dry sunny conditions; wet conditions where there’s rain, sleet and snow; and windy conditions with lots of wind-blown snow and hail, where ski googles are essential. We also all cope with the conditions differently. All of these variables play into the choices you make in preparing for a winter day hillwalking in Scotland.
Boots and crampons
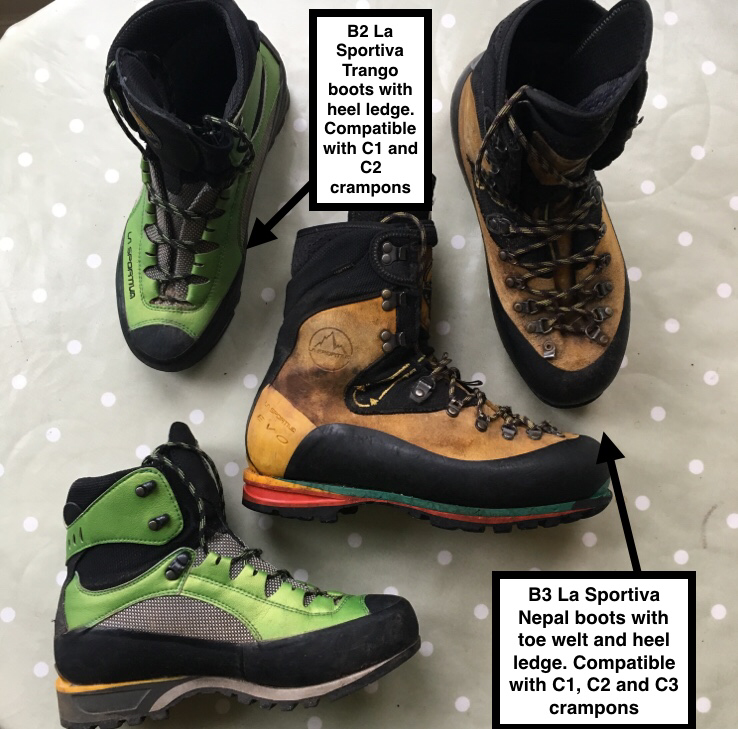
Winter boots have stiff soles and are warmer than summer boots. Some also have features like toe and heel ledges to make them compatible with certain types of crampons. The stiffness of the sole is really important because it allows you to kick into the snow, forming steps and ledges. There are three types of winter boots:
- B1 – These have a bit of flex in them, making them more comfortable to walk in. They don’t have a heel or toe ledge and so are only compatible with a C1 crampon, with heel and toe baskets. They are suitable for winter walking rather than winter mountaineering.
- B2 – This type of boot is stiffer than the B1 boot and has a heel ledge allowing it to take a C2 crampon with a heel clip. This means it is easier to kick steps in snow, crampons can be fixed more securely, and you can generally cope with steeper terrain. The boot also has the advantage of being lighter than B3 boots.
- B3 – These are the warmest and stiffest type of boot. They have a heel and toe ledge that enables it to take a C3 crampon (this type of boot is also compatible with C1 and C2 crampons). These boots are suitable for winter climbing and high-altitude mountaineering. They are good for general hillwalking too, but can be a little heavy.

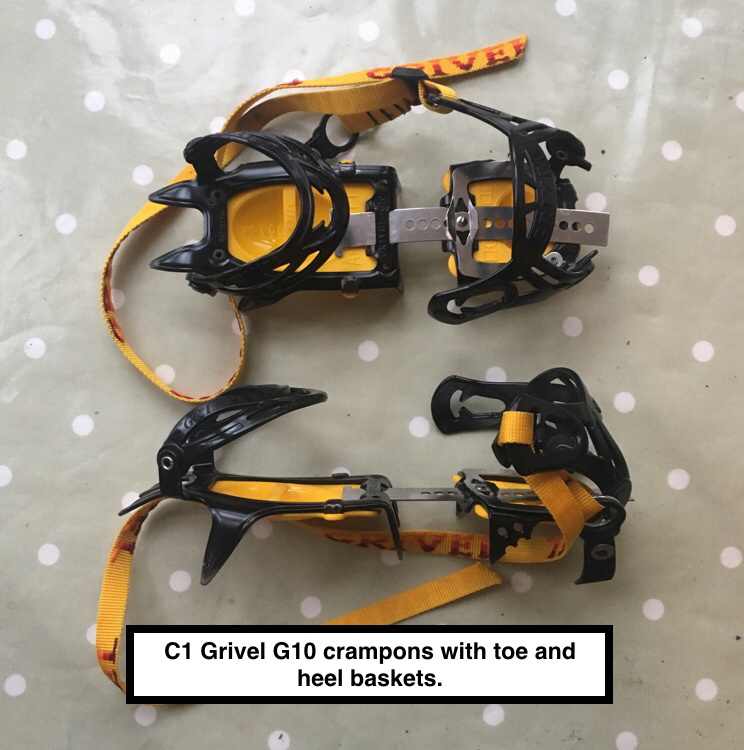
Crampons come in three types as well:
- C1 crampons have baskets at the toe and heel, and are the only type of crampon that will fit a B1 boot. They are secured to your boot by a strap. These crampons tend to have 10 or 12 points and have flat or horizontal front points.
- C2 crampons have a basket at the toe and a clip at the heel, allowing them to be attached securely and quickly. These crampons have a strap and also tend to have flat or horizontal front points.
- C3 crampons have a toe bail and heel clip providing a very secure fit, making them well-suited to winter climbing and mountaineering. They also have a strap like the C1 and C2 crampons. The number and type of points can vary. Some have 14 points (like the Black Diamond Sabertooth crampons below), some have flat horizontal front points, and some have vertical front points. It should be noted that vertical front points are designed for ice climbing and aren’t as good as horizontal front points for general winter hillwalking.
Most crampons are made from steel and are very robust. You can buy lightweight aluminium crampons, but these won’t last as long as the steel ones.
Some walkers like to use microspikes. These are fine for snowy trails and flat winter terrain, but the absence of front points means that they aren’t suitable for steeper terrain, particularly slopes with hard snow or ice.
Winter boots and crampons can be hired in Scotland from Tisos (£20 per day for an ice axe, winter boots and crampons).

Keeping your legs warm
My preference is to wear salopettes, wearing them all day, right from the start. Salopettes have shoulder straps, come up to your tummy or chest and usually have internal gaiters. I prefer these to overtrousers because they don’t slip down and are warmer. Whether you choose salopettes or overtrousers, they need to be waterproof and windproof. I like to wear thermal leggings (fleece or wool) under my salopettes.
It is important to make sure snow doesn’t get into your boots. You can achieve this by using short gaiters, long gaiters or the internal gaiters on salopettes (with some bungee cord). I find having the gaiters underneath the salopettes or over trousers is more comfortable and more effective in stopping snow and water.

Layers for your upper body
There are lots and lots of options here. My advice is to have at least four layers on your top half. Your jacket must have a hood and be waterproof and windproof. I like to use Polartec 100 fleece under my jacket because it wicks moisture well. Some other options include synthetic down, natural down, wool and softshell.

Back-up duvet
I think it is a good idea to have a backup warm layer in your rucksack. Keep it in a waterproof stuffsack to make sure there’s no chance of it getting wet. I use a Lowe Alpine synthetic down jacket (it’s 25 years old now). Although it’s bulky, it’s really warm. I sometimes reach for my duvet when I stop for breaks on the hill. Even though I may not use it on my walk, it is reassuring to know I have a backup layer in my rucksack.
Gloves
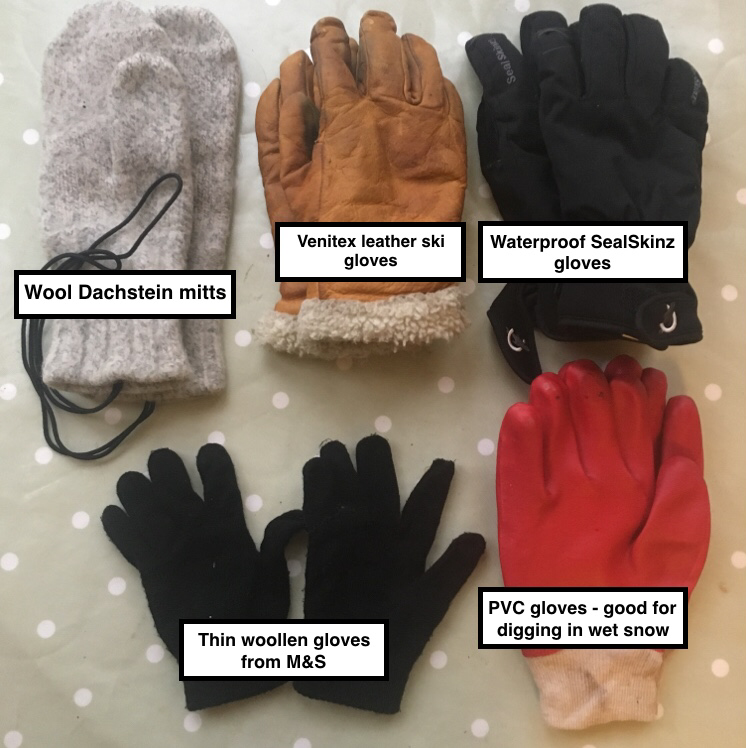
Again, there are lots of options here. You can easily spend £100+ on winter gloves that are warm, have a good grip and are waterproof. An alternative to spending that much is to have several pairs of gloves to suit different conditions, and as a back up if your gloves get wet. For cold, dry conditions, I use Venitex leather gloves – £15. For wet weather, I use Sealskinz winter gloves (again, not too expensive). I always take a thin pair of woollen gloves and my back-up gloves – when all else fails – are a pair of woollen Dachstein mitts. If I am going to be digging a snow hole or working with snow, I like to swap over to a pair of PVC builders’ gloves.
Hats, masks and balaclavas
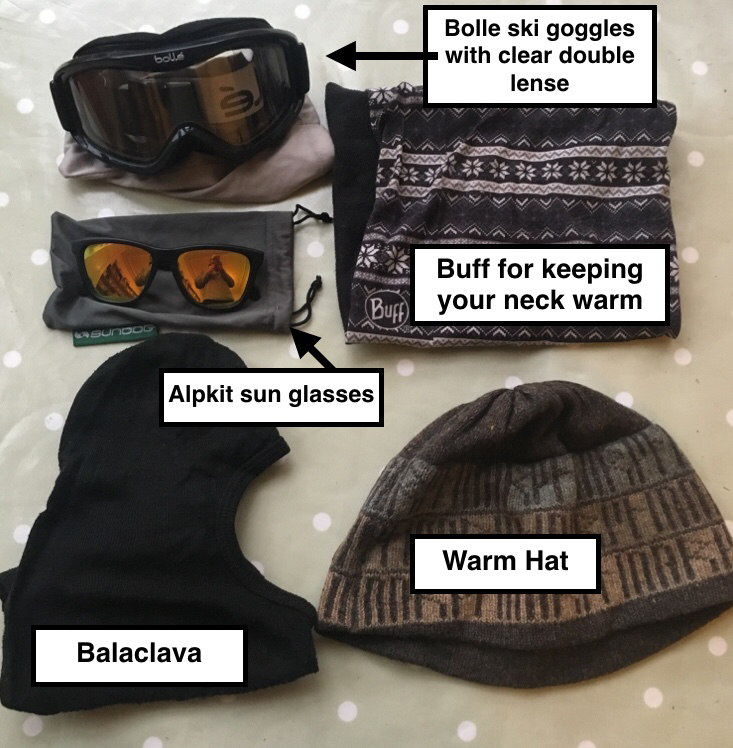
Keeping your head warm is really important. Key to that is a well-fitting jacket hood and a warm hat. In addition to that I like to wear a buff around my neck, which keeps out the drafts. As a backup, I always take a balaclava.
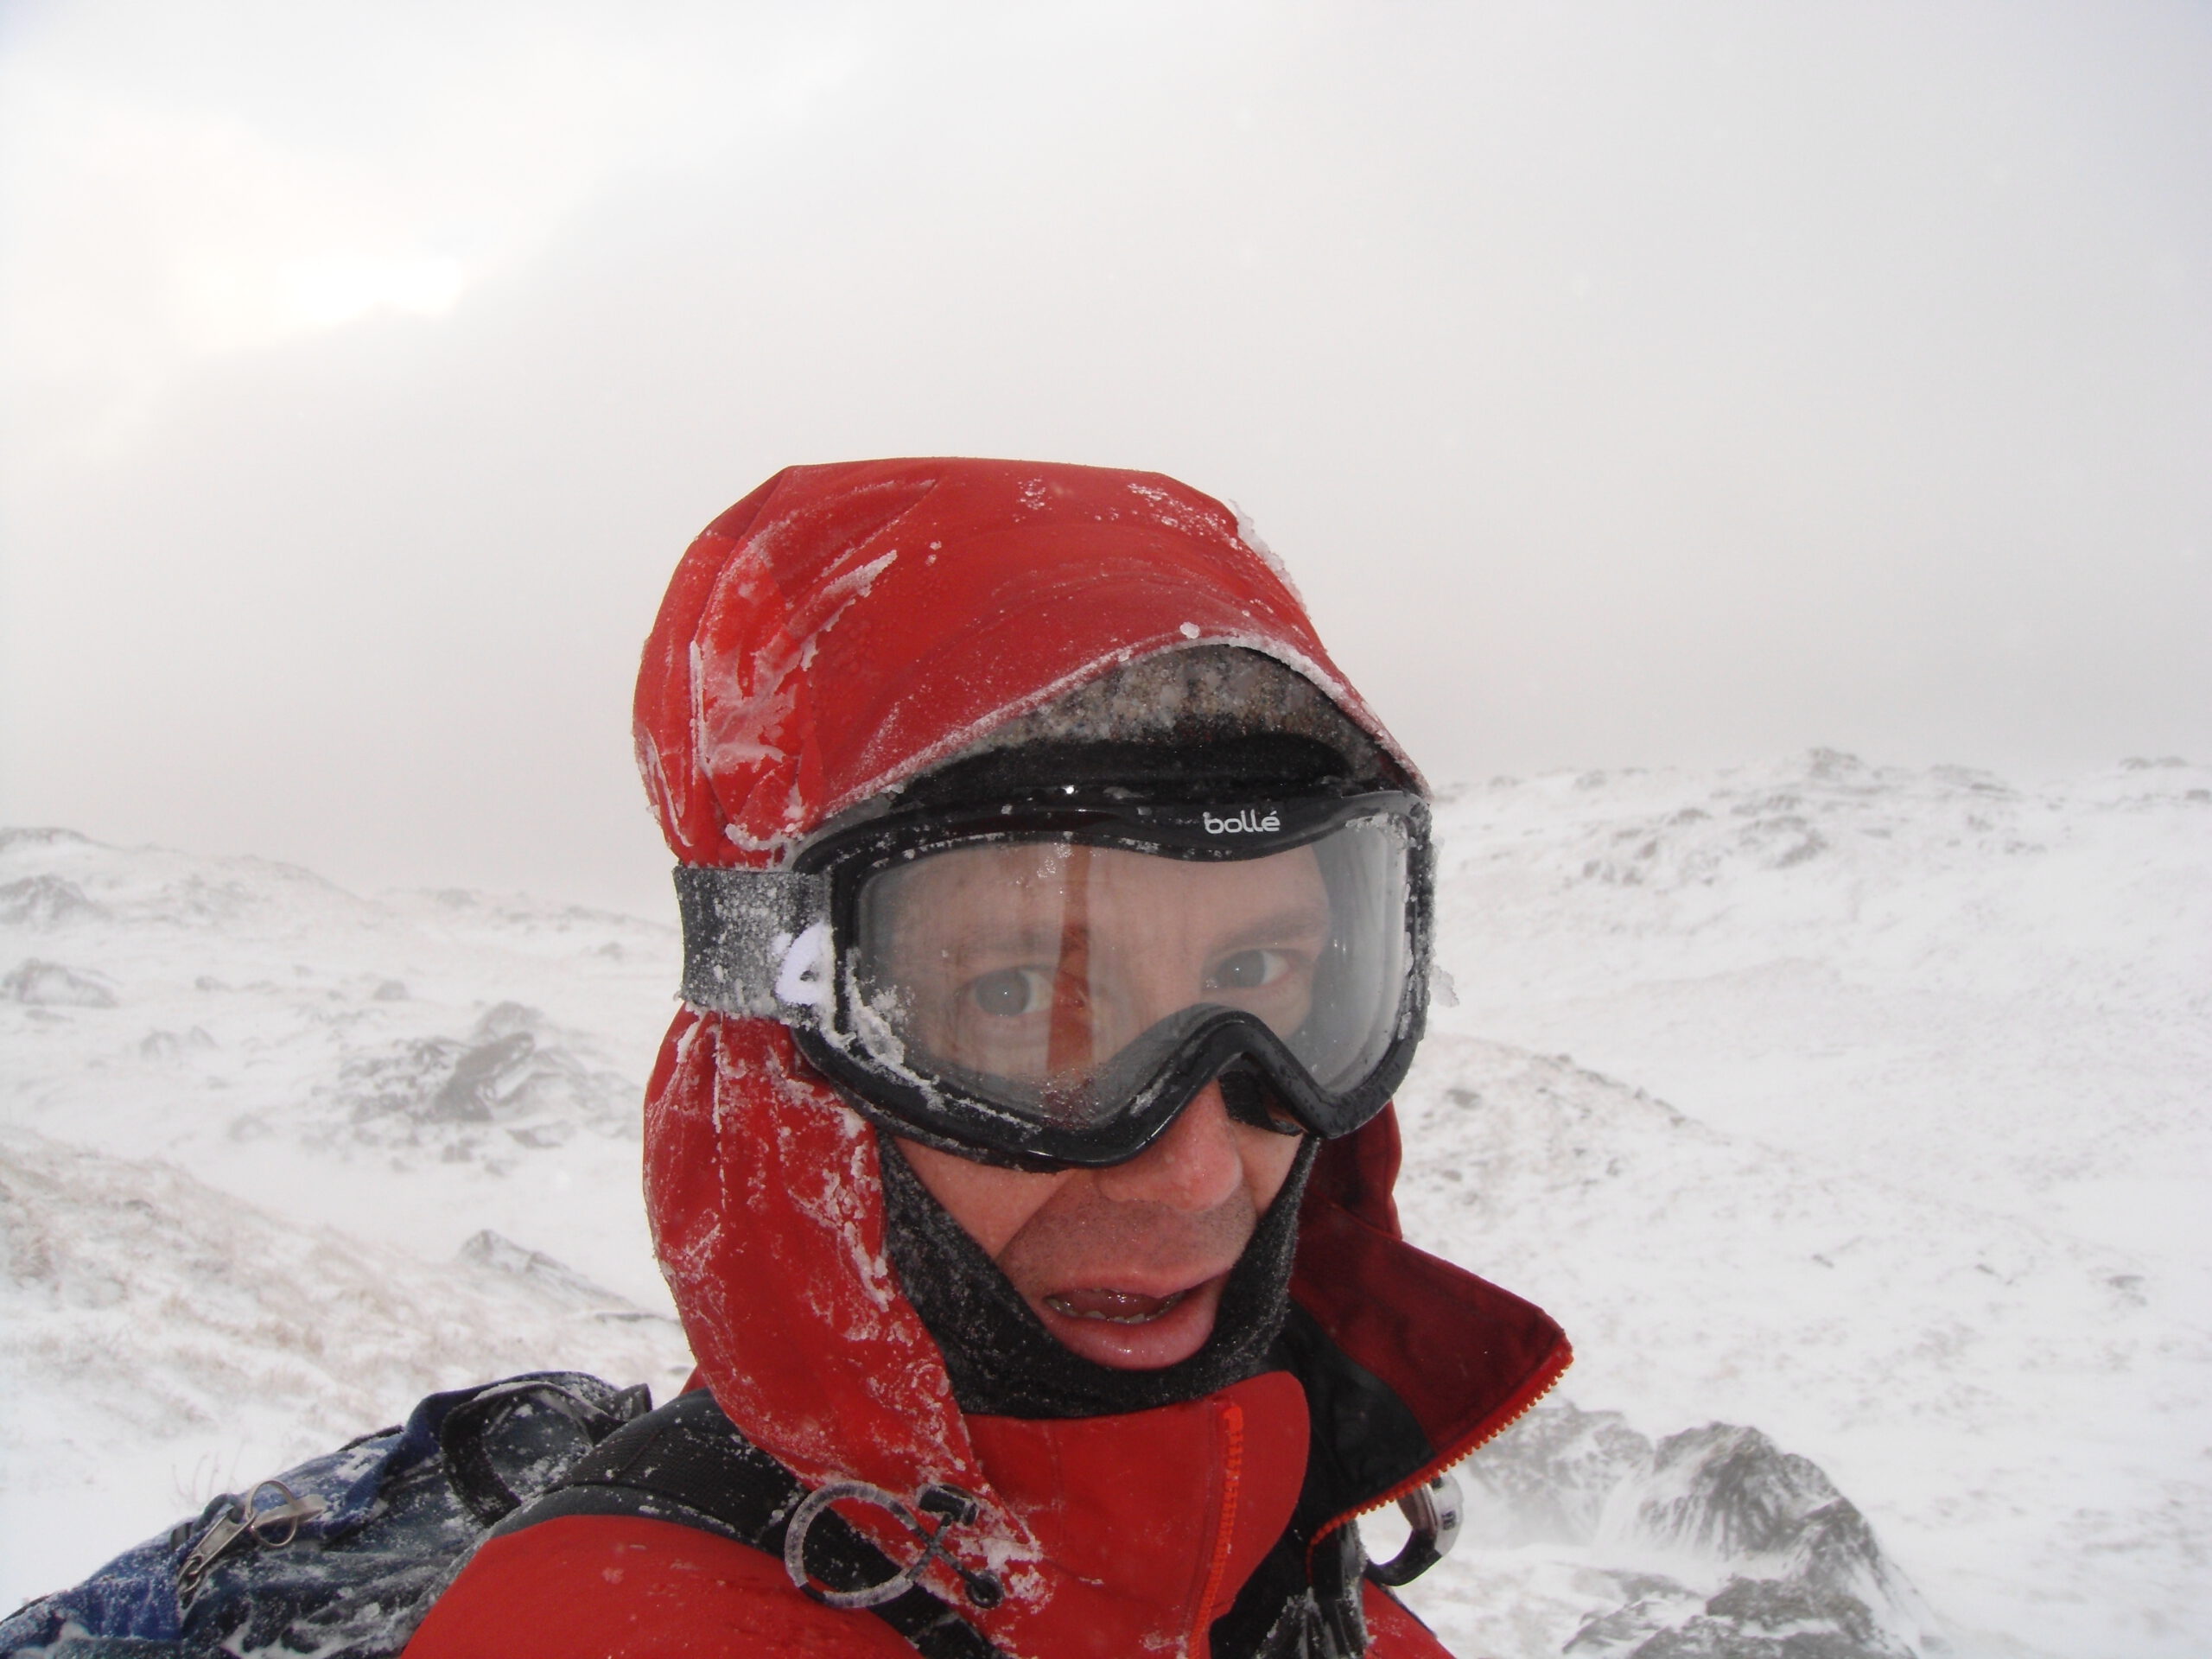
You get a lot of wind-blown snow and hail in Scotland, so a pair of ski goggles is essential. I like to use Bolle ski googles with a clear double-layered lens (about £25). This is really useful in low-light, white-out conditions. The double-layered lens prevents condensation.
Lastly, sunglasses are really important in sunny conditions. You can get great value sunglasses from Alpkit – only £20.
Emergency equipment
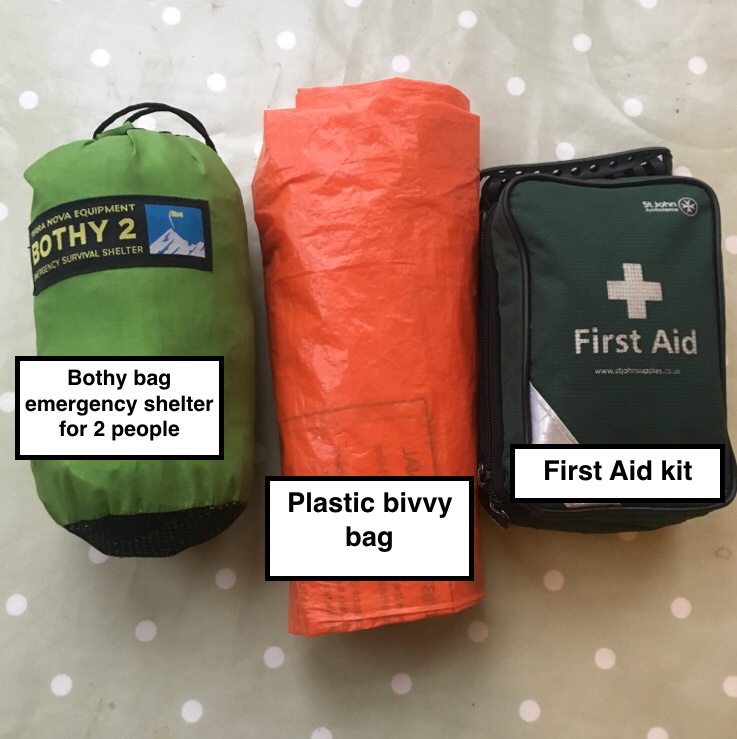
I take a survival shelter (like a bothy bag) with me when hillwalking in winter. It can be really useful to get out of the wind and keep warm whilst taking a break or having lunch. They come in lots of different sizes: 2-person, 4-person, 8-person. I also take with me a plastic bivvy bag and a first aid kit.
Ice axe and walking pole
An ice axe is used to both prevent a slip on the snow and to arrest a slip if one happens. An ice axe can also be used to cut steps on hard snow. There are two main types of ice axe: climbing ice axes and walking ice axes. Climbing axes come as a pair, are shorter than walking ice axes and have bent shafts. They are specialised tools for winter climbing. For general winter hillwalking, an axe with a straight shaft, a pick, an adze and a spike at the bottom is best. The adze is the flat, triangular-shaped bit of metal on the opposite side of the pick. It is used to cut steps and dig in the snow. You can choose different lengths of ice axe. The longer the axe, the more likely it is that he spike at the bottom of the axe will reach the ground when you hold it in your uphill hand. The disadvantage of a long axe is its weight. I like to add self-amalgamating tape to the shaft of the axe – this makes the shaft more grippy and prevents your hand from getting cold when you handle it.
I usually take a ski pole with me (or a walking pole with a snow basket). I usually just take one pole so I can have it in one hand and the axe in the other. It is useful if the pole has foam on the upper part of the pole, below the handle, making it easier to adjust your grip on steep ground. A pole that is collapsible is also really useful, as is having clips that can be opened and closed easily with gloves on.

Rucksack
With all the extra kit and clothing needed in winter, you are likely to need a bigger rucksack. I like to use one that is 45 litres in capacity. To keep stuff dry inside a rucksack liner is essential. I use a large waterproof stuff sack. A cheaper alternative is to use a rubble sack or an animal feed bag (Harbro Ltd sell unused bags).

Other important stuff
Here’s a list of other stuff I take with me in winter:
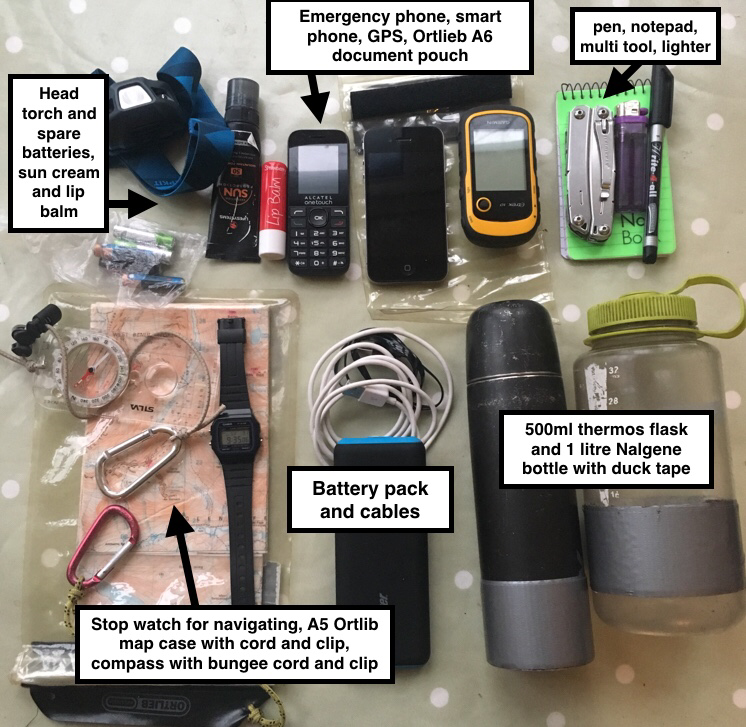
- Head torch and spare batteries;
- Suncream and lip balm
- Emergency phone
- Smart phone with GPS capability. There are lots of useful apps for your smartphone that are useful in winter; for example:
-
- Mapping software like Memory Map ;
- OS Locate, which tells you your grid reference; and,
- A new avalanche awareness app made by the Scottish Avalanche Information Service.
- GPS device, particularly if you don’t have a smartphone with GPS capability.
- Battery pack and charging cables
- Pen, notepad, multitool and lighter.
- Compass with a cord and a clip so I can attach it to my jacket. The cord has toggles on it to help me keep track when pacing.
- A waterproof map case, again with a cord and a clip to prevent it from blowing away in the wind.
- Flask and water bottle
- Food for the day. My favourite hill food just now is pork pies, cheese, oatcakes and chocolate.
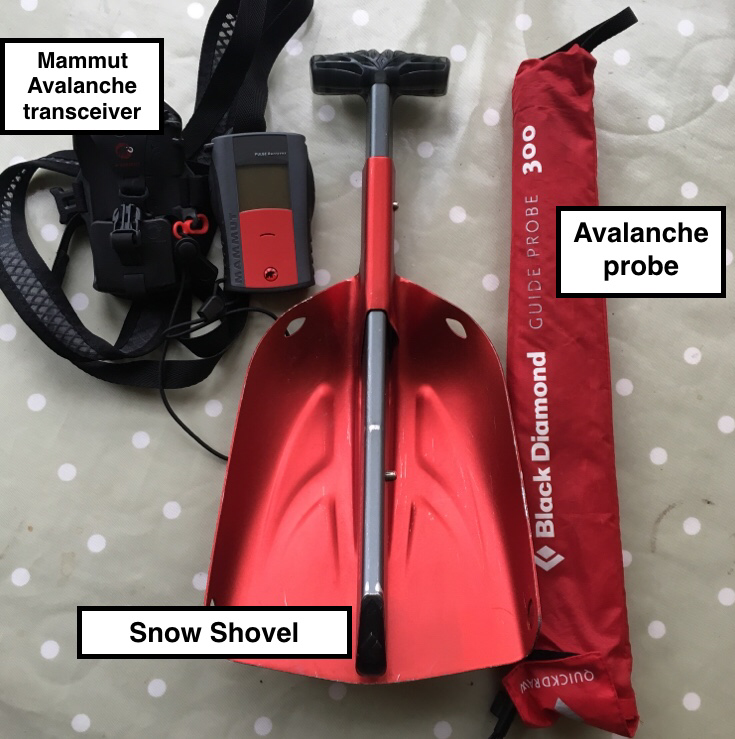
Avalanche Safety Kit
Lastly, here are three important items of winter equipment that are increasingly being recommended as part of a hillwalker’s safety kit, particularly if you intend to venture onto steep terrain where there is a heightened risk of avalanche: an avalanche transceiver, avalanche probe and shovel.
Avalanche transceivers are devices that emit a pulsed radio signal. If someone gets buried in an avalanche, other transceivers carried by the party pick up the signal being emitted from under the snow. The receiving transceivers interpret the signal into a visual and audible display that assists the search. Avalanche transceivers cost £150-£200. Training is important to ensure that the transceiver can be used effectively. An avalanche probe is a long pole (typically 2.5 to 3m long) that is pushed into snow to find a buried casualty. The shovel is used to dig the casualty out.
To be safe, be avalanche aware:
- Read the weather and avalanche forecast as part of your planning.
- Plan your journey in advance to avoid avalanche-prone terrain, like steep slopes, convex slopes and slopes on the lee side of the wind where snow is likely to accumulate.
- Consider your and your party’s skills and experience in planning your walk.
- Look out for signs of avalanche risk whilst on your walk; for example, wind transport of snow, the formation of windslab and cracking in the snow.
- Develop your knowledge and understanding of avalanche risk: learning from others and going on an avalanche awareness course.
If you’d like to learn more about winter kit and equipment and learn winter skills, check out our winter skills courses.