
Edofe mapping is an excellent tool for Duke of Edinburgh’s Award participants for planning their expedition routes. This blog provides instructions on how to use it.
The first step is to access eDofE Mapping from your eDofE account. If you are a participant, select ‘Expedition Section’ and look for ‘Mapping’ at the bottom of the page. If you are using an adult account, you will find ‘Mapping’ under the ‘Resources’ tab on the left-hand side.
If this is the first time you have used eDofE Mapping since it switched over, you will need to set up an OS mapping account linked to your eDofE profile. Click ‘Create Account’ and ‘Continue,’ and you will be prompted to set up an OS account. Follow the steps as prompted to set up your account and once this is done, you should automatically be taken back to eDofE. There is also a good step-by-step guide on how to do this written by eDofE support. Click here to view it.
Once you have set up your account, when you click on ‘Mapping’, you should see a button at the top of the page that says ‘Open OS Explore’. Click this to get started creating a new map.
TOP TIP: You may need to re-login to OS Locate, especially if you are using a shared computer. Click the person icon to the right of the search bar and enter your user name and password when prompted. Once you are logged in, your account initials will show in the circle next to the search bar, instead of the person icon.
Creating a New Map
It’s easiest to create a separate map for each day of the expedition, so if you want to create a Bronze route, you’ll need to create two maps, repeating the following steps twice.
Click ‘ Open OS Explore’ from the eDofE Mapping page.
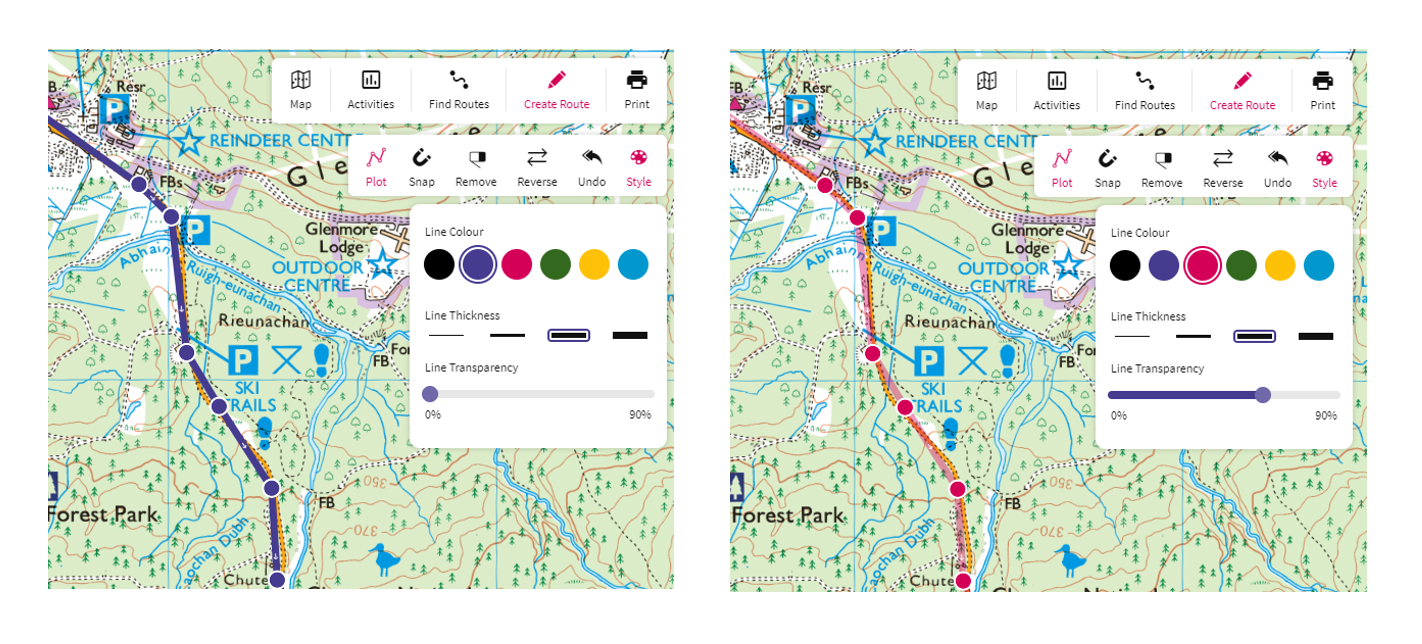
Click ‘Create Route’ in the top right and fill in your Route name in the field that appears on the left sidebar.

Creating the route
First, you need to zoom in on the area where your expedition is taking place. Don’t click on the map, as this will add a Waypoint in a random place. Instead, use the + and – buttons on the right hand side of the screen. Move the map around by clicking and dragging it – hold the left-hand button of your mouse down (keep it pressed down) and drag the map about using your cursor.
You will also need to change the map style from ‘Standard’ (as shown above) to ‘Premium Topo’, which is the full OS map data. To do this, look for the layers icon, which is the bottom of the 5 circular icons on the right hand side of the page. Click this, and a window will pop out with options for Map Types and Map Overlays. Select ‘Premium Topo’ from the Map Types.
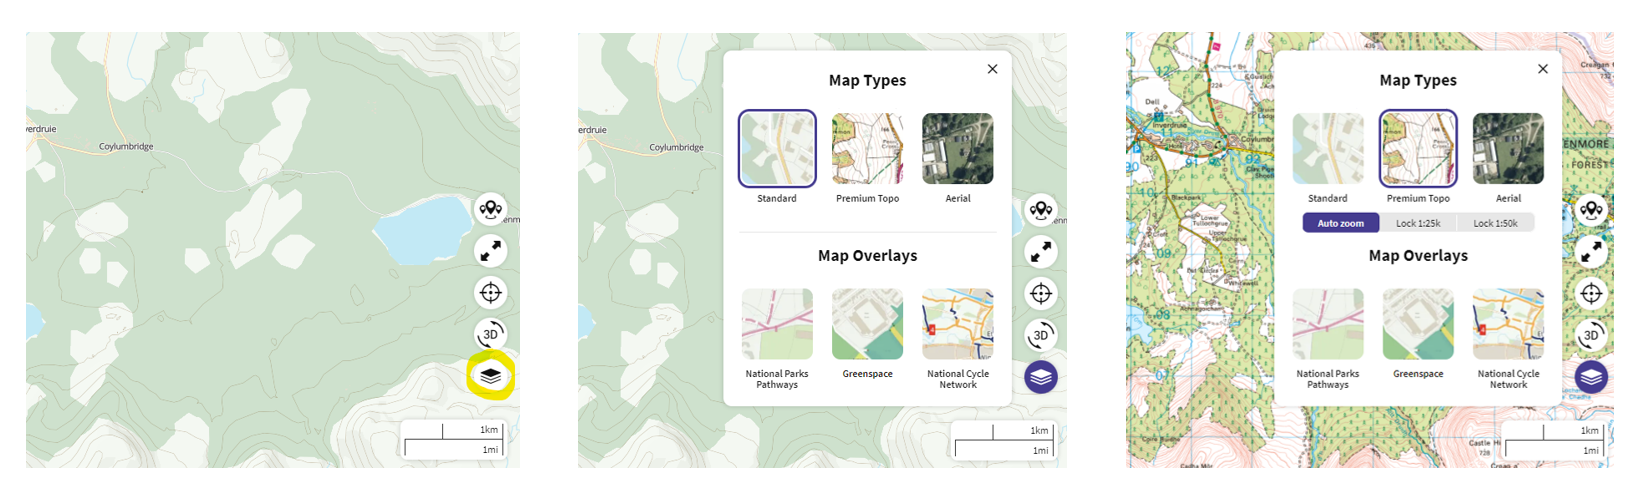
You can then zoom in more on the area to find the exact start point – beyond a certain level of zoom, the map will automatically change from 1:50,000 to 1:25,000. If you prefer, you can use the same layers menu as above to select ‘Lock 1:50k’ or ‘Lock 1:25k’ and stop it jumping between the two as you zoom.
The 1:25,000 map has more detail, showing field boundaries, for example. In some instances, despite having less detail, the 1:50,000 map is clearer and easier to use. The scale of the map you are on is shown on the right hand side of the screen: it shows red for 1:50,000 and orange for 1:25,000.
TOP TIP: If you have been given a grid reference for the start point and want to find out exactly where that is on the map, you can use the ‘Search Locations’ box in the top left of the screen. You will need to enter the map letters (i.e. NH) as well as the 6 or 8 digit grid reference. Take care – the search box will automatically try to suggest locations and if you put in the grid reference and hit enter, it will often take you to the wrong location. Instead, you need to click on the grid reference from the list of suggestions that appear as a drop down. A waypoint will appear at that grid reference. If you right-click on the icon and choose ‘View details’, you can select the ‘Create route’ option that appears on the left-hand side, and this will automatically use this point as your first waypoint.
If you’re not using a grid reference as described in the tip above, find your start point and click on it to start plotting the route. A purple circle with a waypoint icon will appear. This is your starting waypoint.
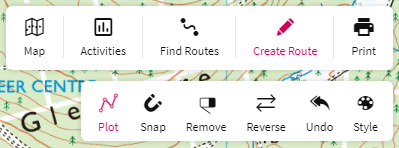
Now, click along the line of the route you want to take to create waypoints along the entire route. Each point is joined to the next by a straight line, so take care to create enough points that the route follows the line of the path, track, or road you intend to journey along. Keep creating the waypoints until you reach the end point of your route. As you create the route, the Route Length will show on the left hand side and if you scroll down on the left hand sidebar, you will also see a profile of the height gained/lost over the route.
If you put a waypoint in the wrong place, you can use the ‘Undo’ option from the menu bar on the top right. Alternatively, you can delete a waypoint by selecting the ‘Remove’ button on the same menu and clicking on the waypoint you want to delete. Make sure you select ‘Plot’ to get back to creating waypoints. You can also move a waypoint by placing your cursor over it, holding the left-hand button on your mouse down, and then dragging it about.
TOP TIP: Once you have created the route, it is useful to zoom out to get an overview of the entire route on one screen. The map scale isn’t fixed. You have the flexibility to change the scale, zooming in and out, as you like.
Editing the style of the map route
The ‘Style‘ button on the menu bar gives options to change the colour, thickness, and transparency of the route line on the map.
A thin, slightly transparent line is good because it obscures less of the map detail underneath the line. Check that the colour of the line isn’t the same as any major roads near to your route because it can make following the route confusing when navigating.
Add routecard detail to waypoints
To create the route card, you’ll need to decide how to break the route up into sections or legs. Then, for each leg, you’ll be writing instructions to help the participants navigate.
TOP TIP: When deciding upon how to break up your route into sections, consider waypoints where there is scope for navigational error. Path or track junctions, for example, are places where participants could make a mistake and go the wrong way. Also consider points along the route where you reach something very clear in the landscape. Examples include: a road, a loch or lake, a bridge, a high point on the route or a prominent building. Obvious stuff like this should be straightforward for participants to match up to the map and consequently confirm where they are on the map.
TOP TIP: When writing route descriptions, describe the features you’ll see along that section of the route. Describe water features, whether you are going uphill or downhill, areas of woodland, buildings, path and track junctions, overhead power lines, etc. Indicate in your instructions whether these landscape features will be on the left or right-hand side. Include in your instructions which compass direction you are walking in. If you need to change direction – for exampl,e at a path junction – describe whether you are to go left or right and indicate what the compass direction is; e.g., north west, east, south west. The instructions for the leg will finish at the ‘leg destination’: the point feature in the landscape that marks the end point of that section of the route. This should be something that is clear in the landscape (for example, a loch, road, bridge, high point) or a point where there is scope for navigational error (a path or track junction).
Once you have decided on your first leg, click on the waypoint at the end of the leg. Click Edit in the box that pops up. Enter text into the ‘Title’ and ‘Waypoint description’ fields and click SAVE.
‘Title’ – should be a short description of the feature that the leg ends at (e.g., Bridge, Track junction, Visitor Centre, Loch)
‘Waypoint description’ – should be a description of the route taken to reach that point (consider what direction you need to walk, what noticeable features you will pass, is it up or downhill?). If the preceding waypoint ended at a path junction, the first instruction in the new waypoint should be which way to go (e.g., turn left at the path junction and walk south).

Waypoints that you have added a title and description to become Key Waypoints and are listed on the left hand side (you may need to scroll down on the sidebar to see them). An elevation profile of the route is also shown.

Repeat these steps for all of the waypoints that mark the end point of legs, all the way to the end of the route (including the final end point). It’s a good idea to save the route as you go along – click the SAVE button shown on the left side of the page in the image above. The prompt ‘Do you want to continue editing’ will appear after you click save, and you can select ‘Yes’.
Once you have written text in all on the waypoints, click SAVE and select ‘No’ when it asks if you want to continue editing.
You can now save a PDF copy of the map with the route on it, ready to print.
Printing the map
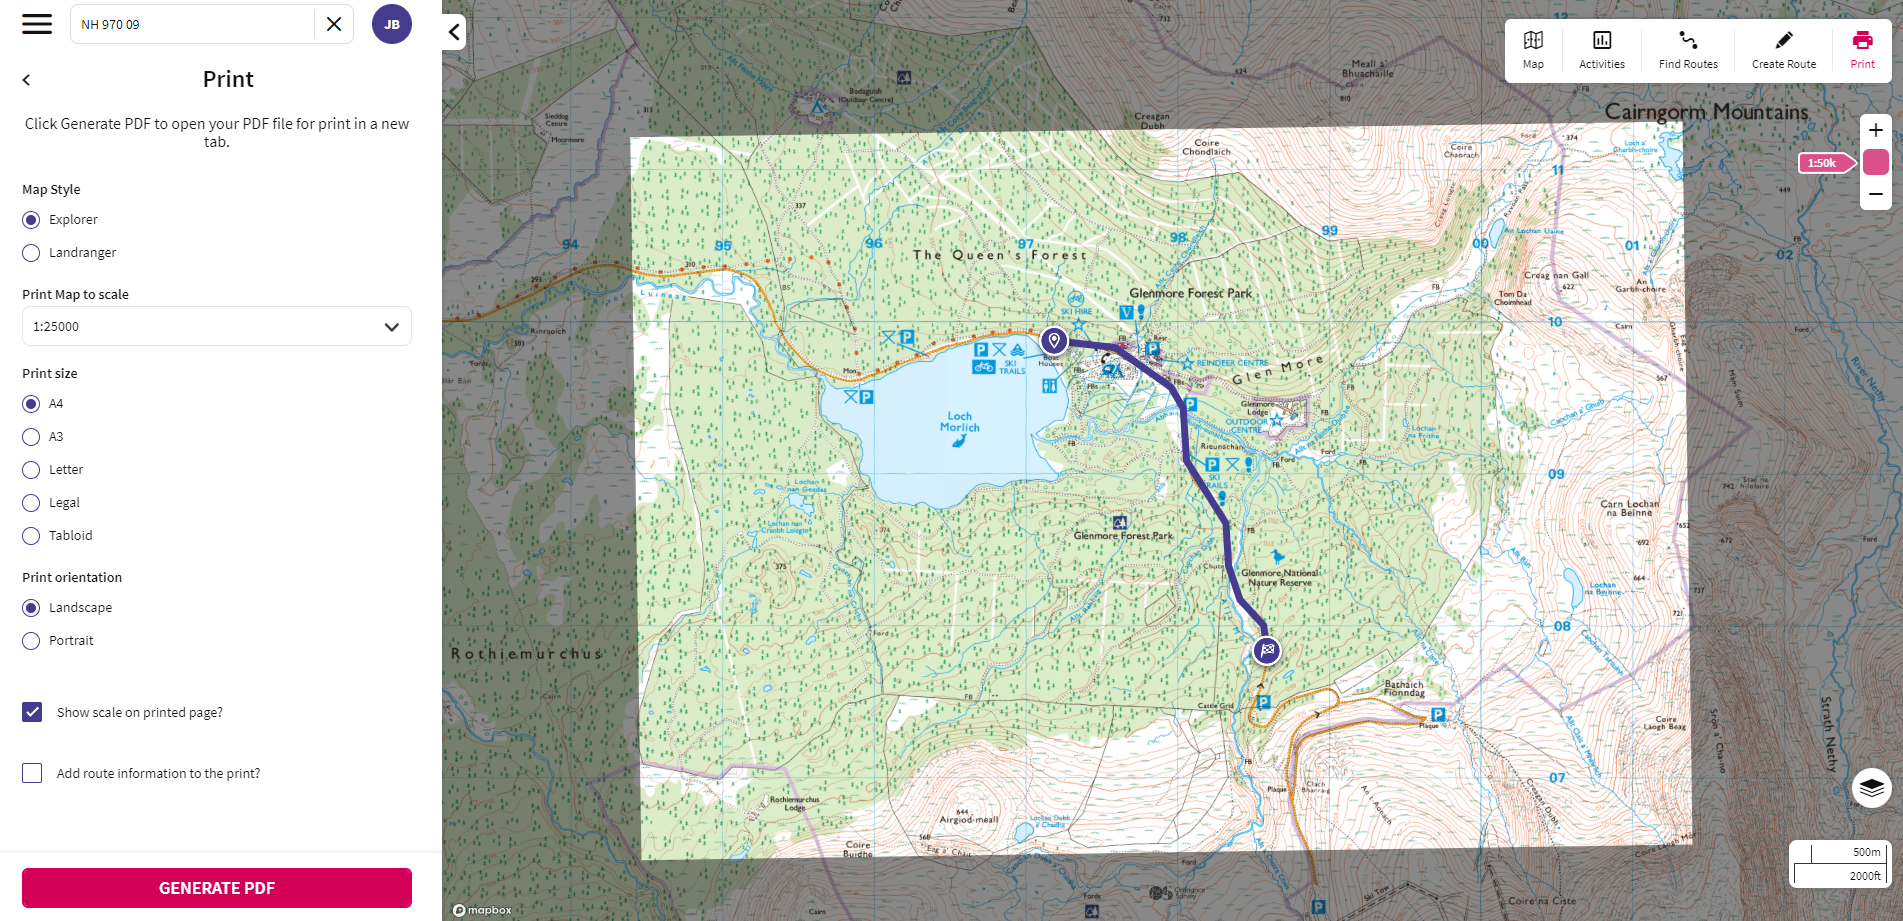
Select ‘Print’ from the top right corner of the page.
Click ‘Show full printable area’.
Move the map so that all, or as much as possible, of the entire route is within the boundaries of the print area. Adjusting the map scale from 1:25,000 to 1:50,000 and changing between portrait and landscape may help (options on the left side of the page). If you can’t get the entire route to fit within the print area, you’ll need to print the route in two maps.
Check the box that says ‘Show scale on printed page?’ on the left side.
Click ‘Generate PDF’.
The map sheet should open in a new window. Click the download icon (top right of the page) and save the map as a pdf.
Importing and exporting gpx files
Another thing you can do is export your map and route card in a gpx format. To do this, exit the print menu by clicking the small back arrow to the left of the word Print. There should now be a set of options in the sidebar menu, including ‘Export GPX’. Click this and then click the export icon that appear,s and the gpx file will automatically be downloaded.

A gpx file contains the route and route card information and can be emailed to others.
Editing the route card
Go back to the eDofE Mapping page and click ‘Get New Maps’ (next to ‘Open OS Explore’). This will update eDofE Mapping with the route you have created, including all the waypoint details.
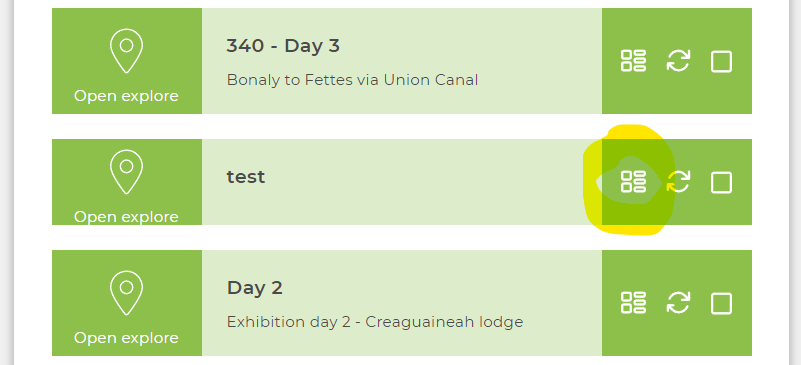
Now look for the route you want to edit the routecard for in the ‘Your Maps’ list – the newest route you have created won’t necessarily be at the bottom so if you create a few routes, you might have to search for the right one.
To edit the routecard, click the icon on the right that looks like a stack of boxes (the text ‘View route card’ will appear if you hover the curser over it).
The routecard should show the legs that you created by selecting the Key Waypoints (end of each leg), and automatically fills in the grid references, distance, height climbed, journey time and ETA (Estimated Time of Arrival), as well as the leg description. You can change the journey time for each leg by adjusting the ‘Speed in km/hr’ option at the top of the page – normal walking speed, on the flat without an expedition rucksack, is 5km, so over an expedition route a good estimate is 3 or 4km per hour.
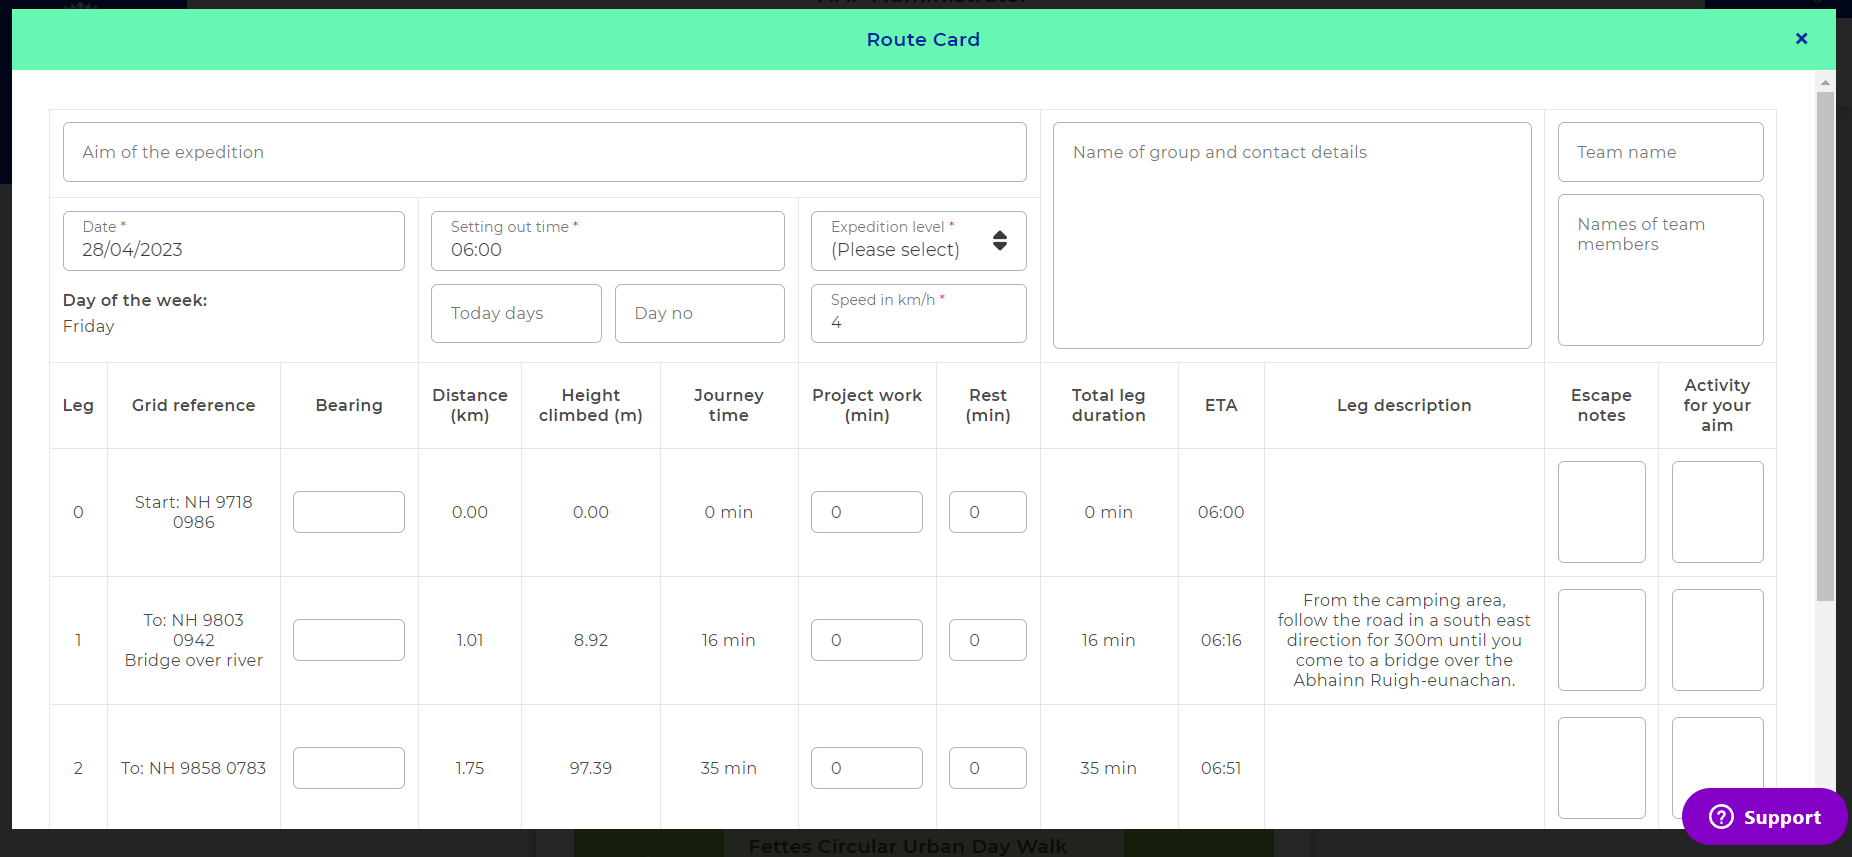
Fill in as many details as possible in the expedition details section at the top of the page, including: Aim of the expedition, Date, Expedition Level, Name of group and contact details, Team name, Names of team members. The box that says ‘Today days’ should say Total days – 2 for Bronze, 3 for most Silver, 4 for most Gold expeditions. ‘Day no.’ is which day of the expedition it is (e.g. Day 1). Enter a Setting out time. This might depend on travel on the first day, but generally speaking will be between 08:00 and 10:00. The ETA for each leg will adjust automatically if you change the setting out time.
To complete the route card, add the additional information in the following columns:
- Bearing – the compass direction for the leg. If there is a change of compass direction during the leg, include this too (for example, you could write ‘south then southwest’)
- Project Work – add any time (in minutes) you want to spend on project work relating to your aim.
- Rest – add time (in minutes) for breaks and lunch.
- Escape notes – add some notes on where you would go if you had to get to a point of safety, in the event of an injury or bad weather. If you are close to the start you could write ‘return to start point’. If you are close to a road, you could right ‘continue along the route to the road and telephone supervisor.
- Activity for your aim – you can use this section to add notes on activities that relate to your expedition aim. For example, there might be a particular historical site you are passing during that leg.
As you add time for rest and project work, keep an eye on the total times at the bottom of the page. Note the following guidance on minimum journeying and daily activity times for each level of the DofE Award.
| Award Level | Min Journeying time | Min Time for Daily Activity (inclusive of breaks and project work) |
| Bronze | 3 hours | 6 hours |
| Silver | 3.5 hours | 7 hours |
| Gold | 4 hours | 8 hours |
You can also add your supervisor’s information at the bottom of the page, if you know it.
Once you are happy with all of the details on the route card, click ‘Save Route Card’ at the bottom of the page. Once you have saved it, you will be able to select ‘Download PDF’.
Printing the route card
To print the route card, select ‘Download PDF’ from the bottom of the route card. This will open a new window with a PDF version of the route card. Download this by clicking the download icon in the top right of the page and save it. You can also print the route card directly from this page.
TOP TIP: If you want to have the map open while you edit the routecard (for example to check bearing directions), you can click ‘Open OS Explore’ at the bottom of the routecard and it will automatically open the route map in a new window (you’ll need to change the layers to show ‘Premium Topo’, as above). You can select ‘Modify Route’ from the left-hand side and make edits to the route if you need to (don’t forget to click save). To get the route card to update, you need to close the route card and click ‘Get New Maps’ at the top of the eDofE Mapping page, then reopen the route card.
Merging Maps and Routecards
To complete your Bronze, Silver, or Gold Route, you’ll need to repeat the entire process set out above for each day. Once you have finished and have produced pdf documents of the maps and route cards for the different days, you are ready to combine and compress the PDF documents. A useful tool for doing this is a free, online bit of software called PDFCompressor.
Using the software, combine your PDF documents into one document. Next, compress the combined pdf doc, which makes its size smaller and easier to email.
Sharing Maps and Routecards
You can share your maps in route cards in one of three ways:
- You can email a combined and compressed PDF of your map and route card;
- You can email a GPX file (one for each day of the route); or,
- You can use the edofe map sharing tool (this is only available to participants).
To use the map sharing tool, go to the eDofE Mapping page and find the route you want to share. Select it by ticking the box on the right next to each – you can select more than one at once. Then click the ‘Send’ option at the bottom of the page, and when the New Message window appears, type in the name of the leader (or member of your group) that you want to share it with. You will only be able to send maps to others within your Award Centre.
Useful FAQs – https://help.edofe.org/hc/en-gb/articles/115000556529-eDofE-Mapping-FAQs